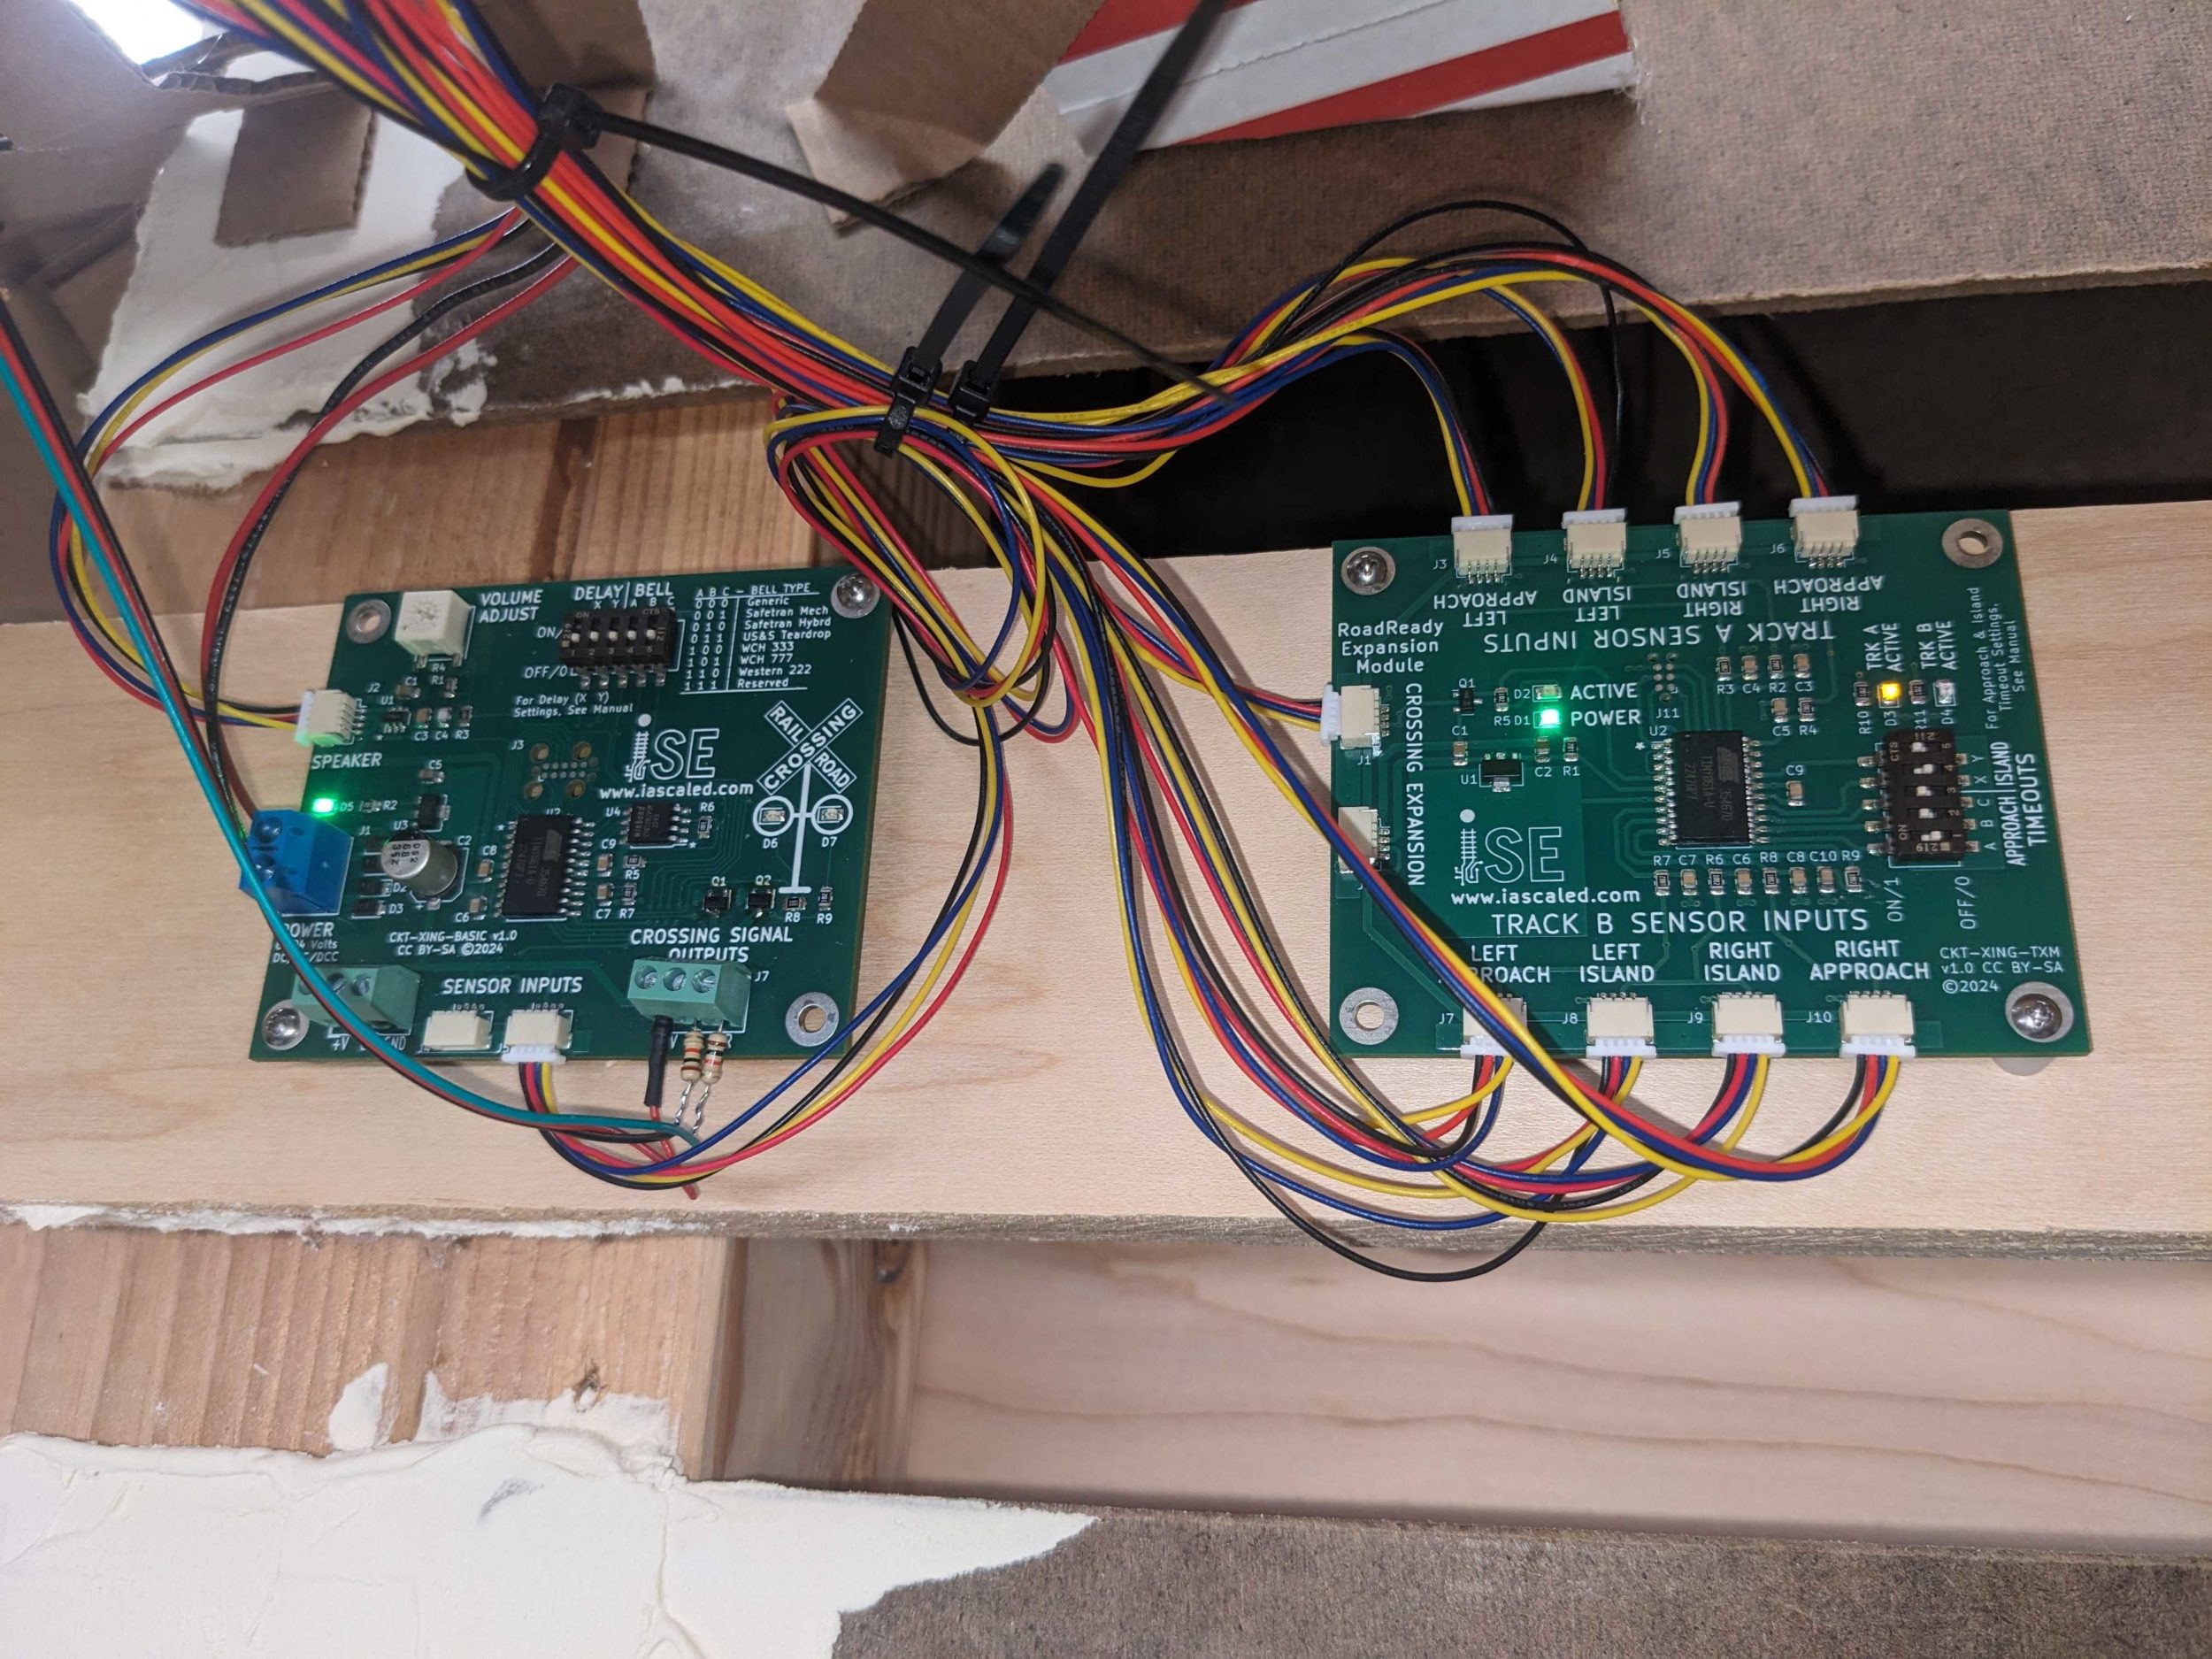
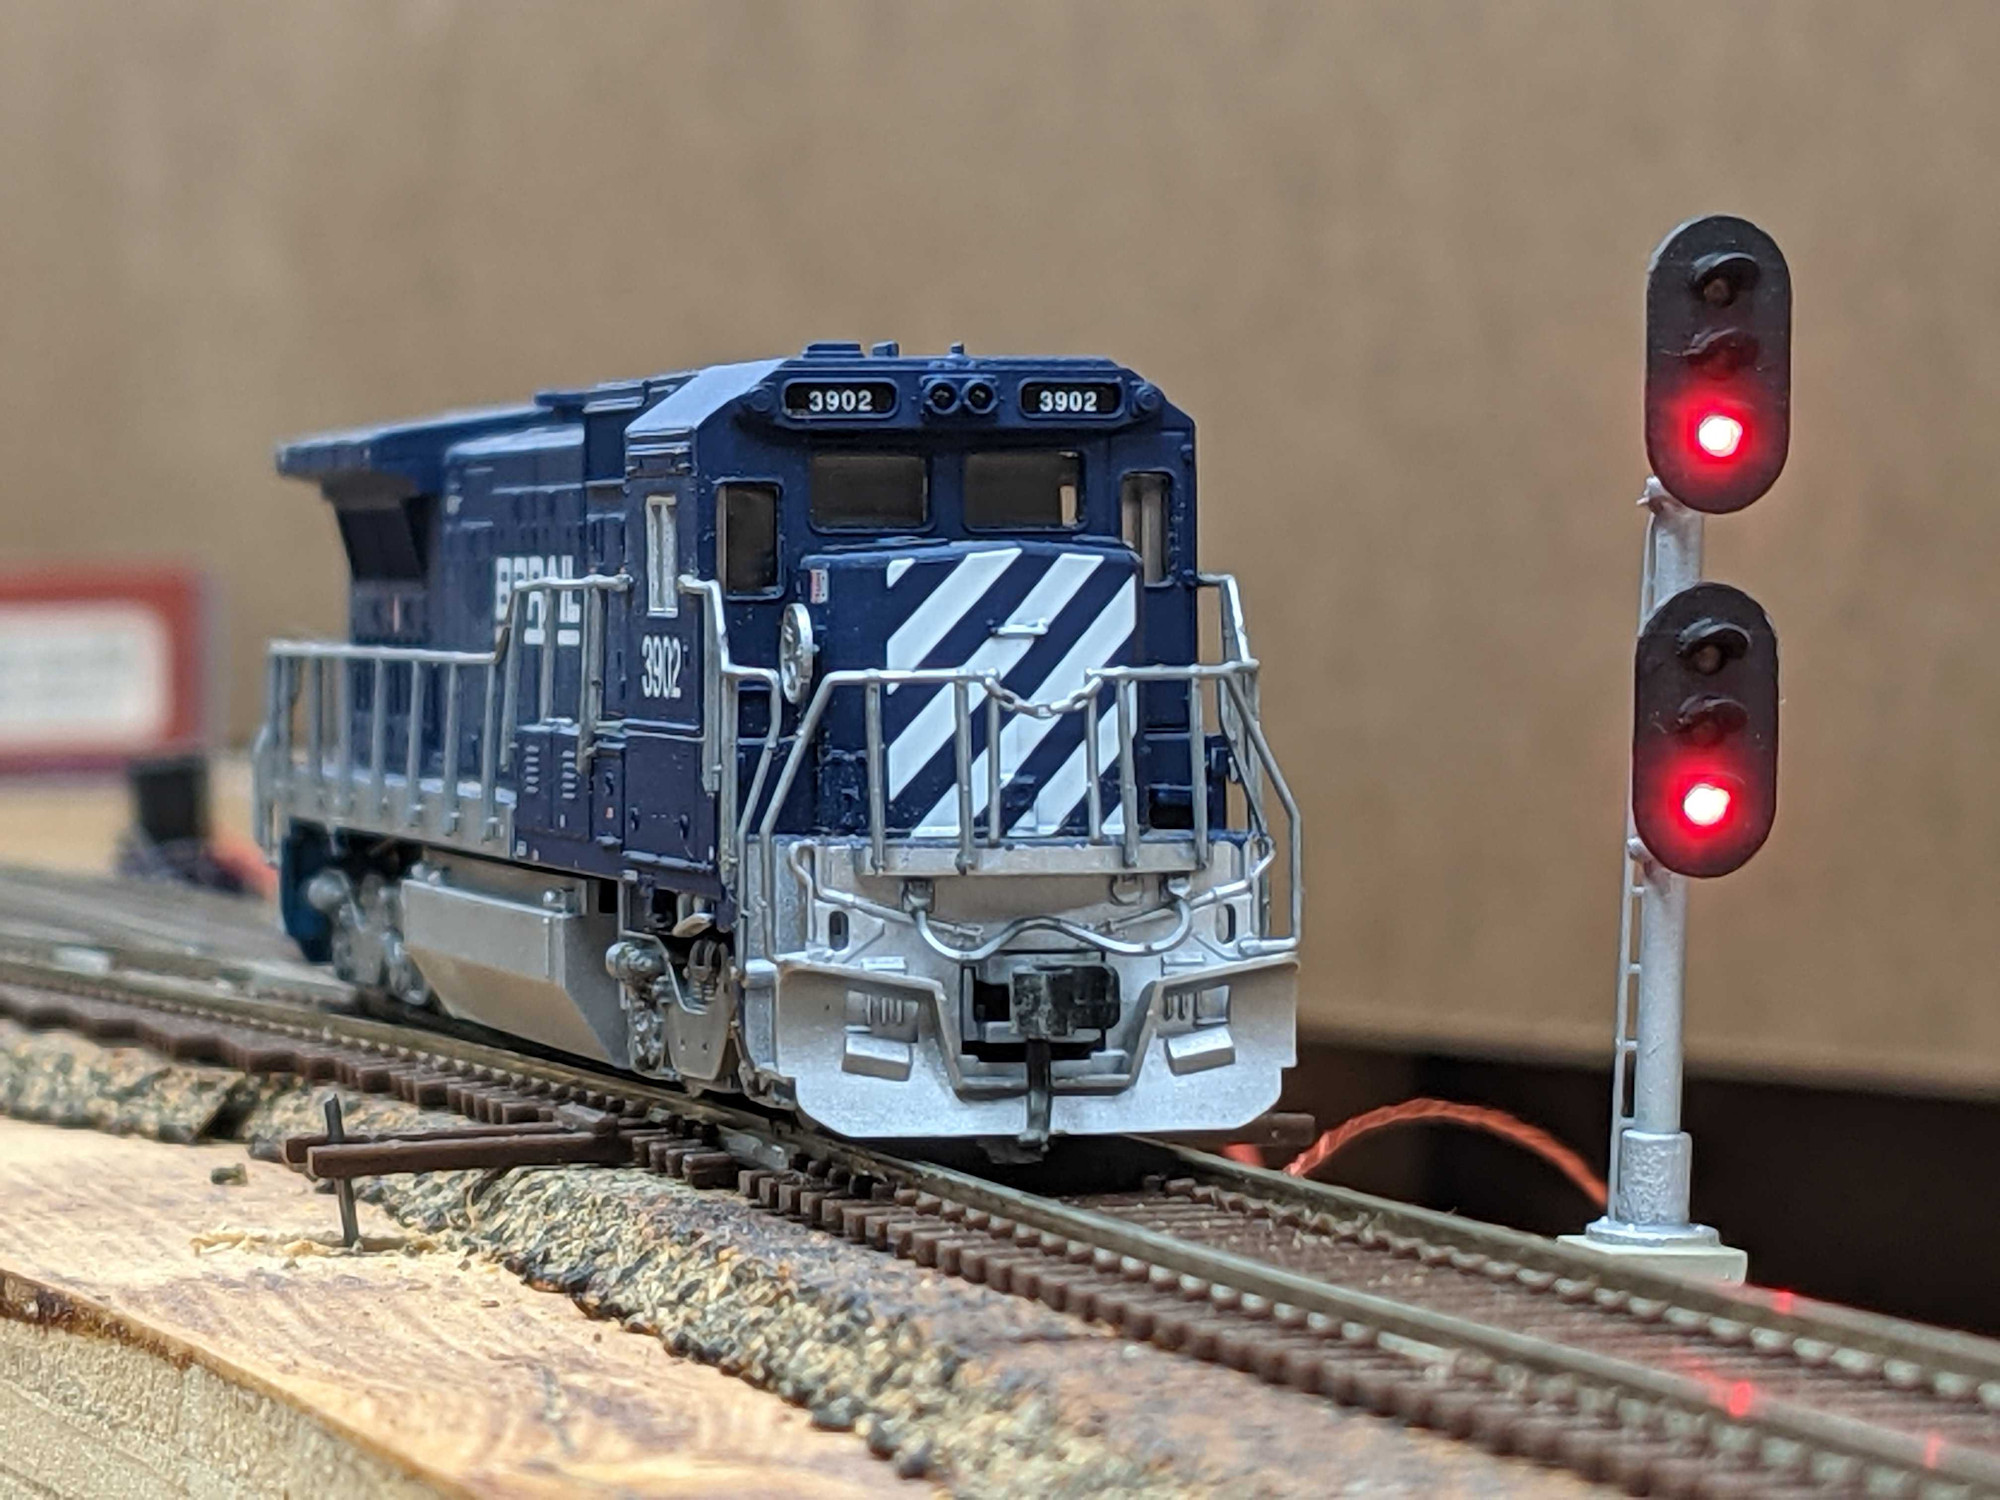
This is one of the rare instances where what I need to do for my second job – Iowa Scaled Engineering (aka ISE) – and what I want to do on the layout come together. One of the things I’m currently working on for ISE is a line of grade crossing controllers. The first one – the RoadReady Basic – is just a simple island-only crossing controller, designed for industrial tracks or other places where signals are needed, but train speeds are low and you don’t need approaches. However, the second piece coming out is the Track Expansion Module, which is designed to add full approach and island logic for up to two additional tracks. Turns out, testing such things on the bench with switches isn’t a lot of fun, so…
Turns out, my CRNW has a perfect application for such a thing. At Strelna, I have the McCarthy Road crossing the main and siding and then making a left turn. Since the road wouldn’t be able to use the not-abandoned-in-my-fictional-world grade up Kotsina Hill, I have the road breaking off to the south after the Copper River crossing and then coming back together with the line at Strelna. (Coming back in from the north, oddly, which means it went over the tracks somewhere in the miles between, I guess? Darn consistency errors.)
I installed both the basic crossing controller and a track expander, along with the eight required TrainSpotter IR sensors (one approach on each side plus two for the island on each track) and have had a ball both running a manifest freight of random cars back and forth, and working out the software bugs. It’s a lot more fun working out software bugs when you get to run trains at the same time, even if it is back and forth over the same 30 feet of track.
The bell speaker is mounted directly under where the proposed road will cross the track. Depending on how much scenery attenuates the sound, I may have to move it. And yes, the crossing signal is HO, and temporary. I won’t install the real N scale signals until after the base layer of scenery is done. Plus at least the one on the far side of the track is going to need heads in three directions – forward, backwards, and down one side.
Like everything around here, we can’t talk about the model until we’ve learned a bit about the history of the bridges in the Copper River delta.
The original plan for the Copper River Railroad – Heney’s predecessor purchased by the CR&NW when they gave up on Valdez and Katalla as starting points – was to build up the west side of the Copper River delta, along the edge of the mountains. The route would have departed from the as-built alignment just west of Flag Point (around milepost 27) and then cross the Copper about half a mile below Child’s Glacier on a bridge that would have been bigger than the famous Million Dollar (Miles Glacier) bridge. The line would have then continued on the as-built right of way over the Miles Glacier bridge and northward.
This avoided crossing the myriad of shifting streams and channels in the delta, but caused so many other problems. Building along the foot of the mountains would have required several miles of snowshed to protect against constant winter avalanches. Heavy rockwork would have been required to build a grade through the base of the mountains. It would have crossed the glacial moraine below Goodwin Glacier, which would have caused ever shifting and sinking trackwork. To top it all off, it would have needed a bridge even more magnificent than the Million Dollar Bridge. Preliminary work showed that the proposed Childs Glacier bridge would need four 400ft spans, one 300 foot span, and possibly two more 200ft spans, and with the same 35+ foot clearances to accomodate calving icebergs and seasonal flooding.
Chief Engineer Hawkins of the CR&NW requested a study to route the line through the Copper River delta instead. The alternate route would still see heavy snowfall, but no avalanches. It would also require miles of fill and trestles to cross the swampy terrain. During the evaluation, though, engineers only identified three places where cheap wooden trestles would not be suitable – Flag Point Channel (milepost 27.1), Round Island Channel (milepost 27.9), and Hot Cake Channel (milepost 33.9), the main flows of the Copper through the region. The bridges would also only need to be low structures, as river levels only varied 8-10 feet in the lower delta, versus 35 feet at the proposed Childs Glacier crossing.
The Three Channels
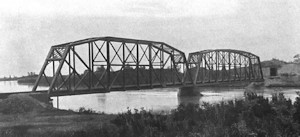
The Round Island truss spans back in the day.
Other than the two big bridges at Miles Glacier and Kuskulana, the three bridges in the delta were the only steel bridges on the railroad.
The Flag Point Bridge consisted (from west to east) of a 300 foot Baltimore truss with a curved upper chord connected to two 175ft Pratt trusses, followed by a timber trestle, then another four 150ft Pratt trusses and finally more trestlework to reach Round Island itself. The Pratt trusses here all had flat upper chords.
Round Island Channel, on the east side of the island, was bridged with a 300ft and a 260ft Baltimore truss.
Finally out at Hot Cake Channel, the railroad crossed another major river flow using a 200ft Pratt truss at the west end, a 150ft trestle, and then two more 200ft Pratt trusses. There was originally a long timber trestle approach on the west end over gravel and sand bars. All of the trusses had arched upper chords.
After the Railroad
As they say, Mother Nature always laughs last.
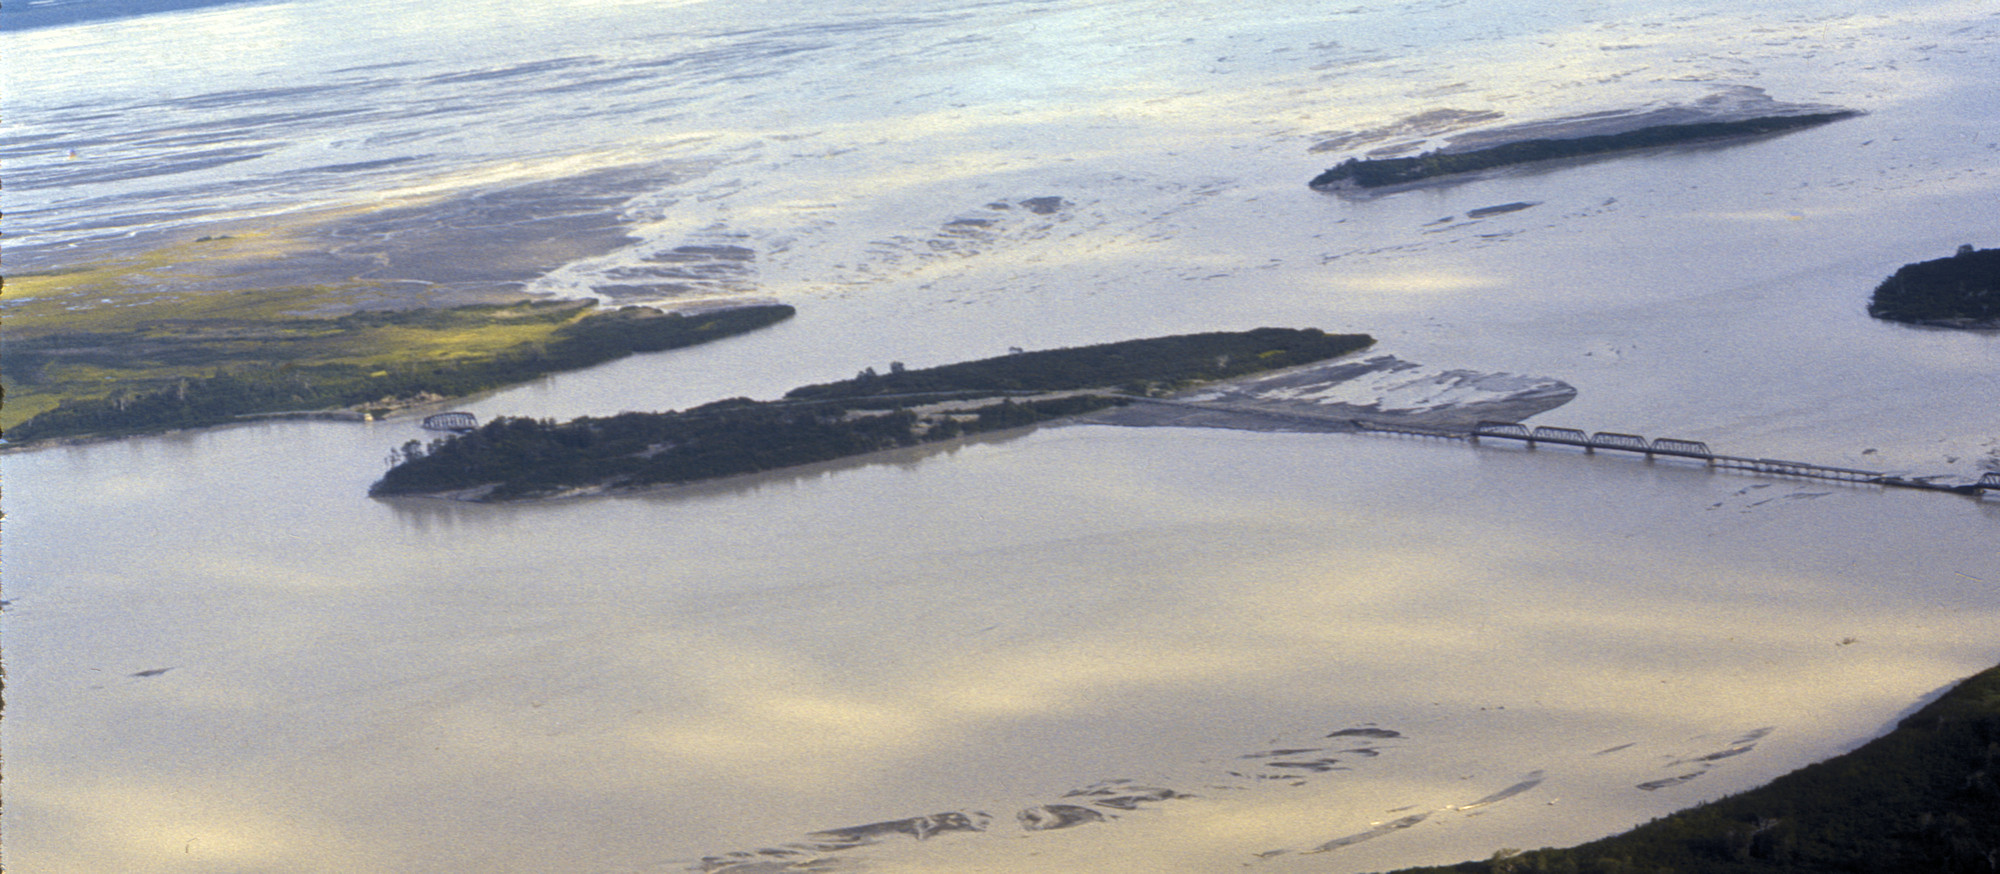
All of the bridges made it through the railroad years, and were converted to highway use after the line was abandoned. The Great Earthquake of 1964 rendered them all unusable. The Flag Point spans all stayed out of the water, but the piers and spans all shifted significantly and suffered subsidence. The center pier of the two Round Island spans disintegrated, causing the eastern span to be lost into the river, and dropping the center end of the west span in the water. Hot Cake stayed out of the water, but again there was significant damage to the piers and subsidence on both ends. None of this is surprising – my understanding of the concrete construction is that it was just embedded in the gravel under the river without deep supports, and there was little or no reinforcing within the concrete.
Flag Point (right) and Round Island (left) bridges from the air after the 1964 earthquake.
When the highway was rebuilt between 1970-1978, all of the railroad’s bridges were demolished and replaced with modern pre-stressed concrete deck girder bridges sitting on piers of concrete-filled steel columns . Those all held up relatively well until 2009. Since then, flows on the Copper River have shifted to the east. Those shifting flows have damaged bridge 339 and washed out all of the fill between it and bridge 340. These would have been where the long trestle and Hot Cake Channel bridges originally were. In addition, the shifting channels have washed the right of way into the river up at around milepost 44.
The Copper River delta is a dynamic place, and no matter what gets built, it will be an ongoing battle against the shifting channels and periodic floods to sustain it.
The Model Version
Regardless of if it were rails or highway decking on them, the 1964 earthquake would have done them in – even the ones that didn’t wind up in the water. At the least they would have been removed from their damaged piers and the piers replaced, along with rebuilding all of the approach trestles and earthwork. At worst it would have likely been more cost effective to just rethink the bridges.
Plus there’s the fact that having done the Kuskulana at full scale, Gilahina and Chitina at about two-thirds of full size, and the big Miles Glacier bridge at about half size, I didn’t have a lot of room for more big, to-scale bridges. They already chew up a good part of the total run of the layout, and honestly I’m not that interested in modeling the delta region. There’s nothing operational out there, just miles and miles of glacial sand and gravel with water running through it. The crossings in the delta would need to be just modeled as a symbolic nod.
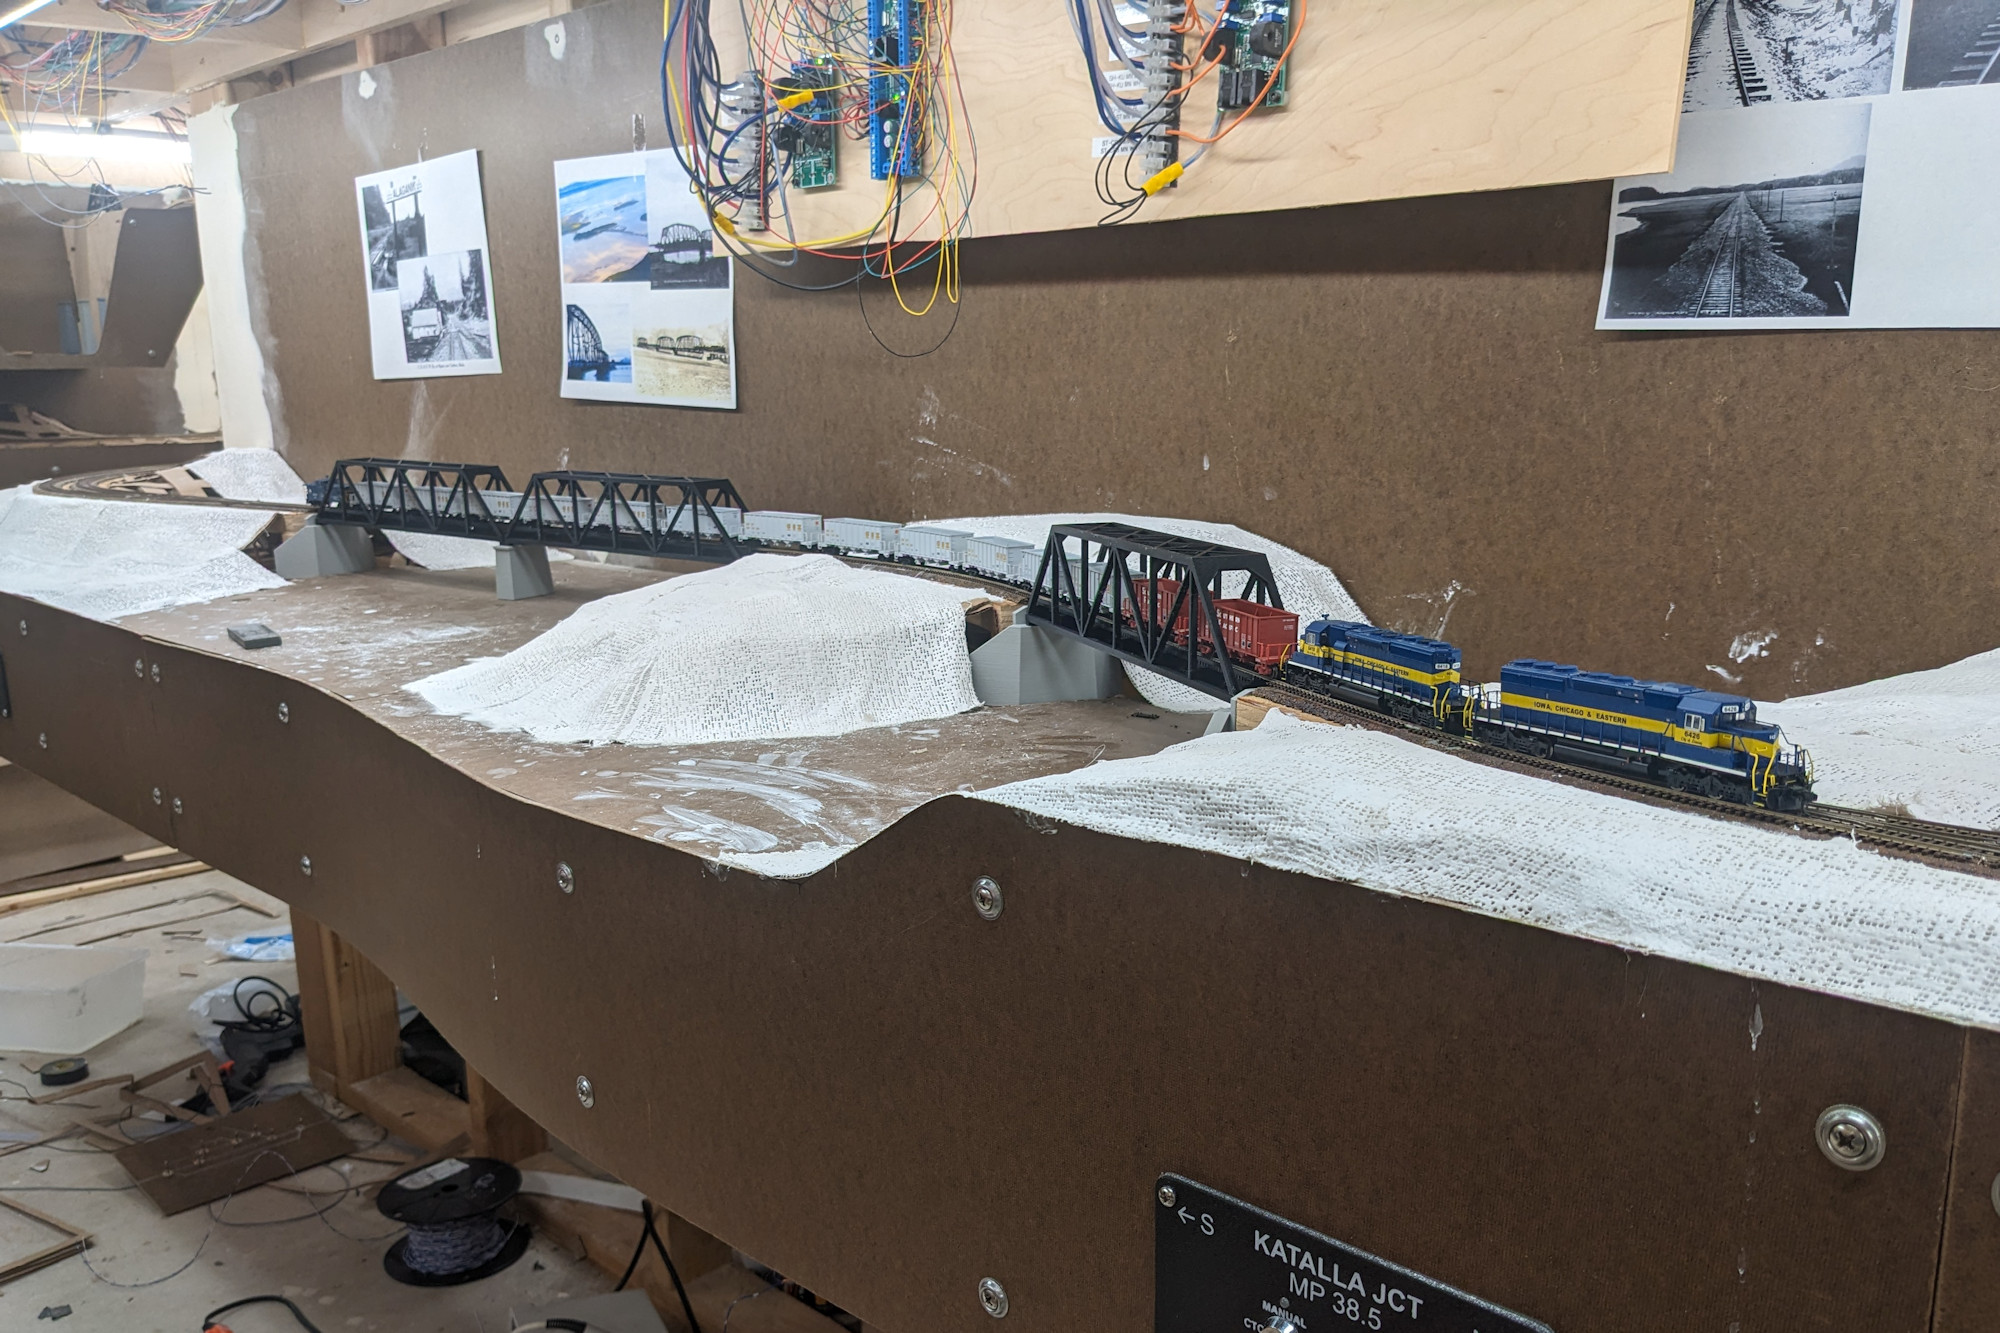
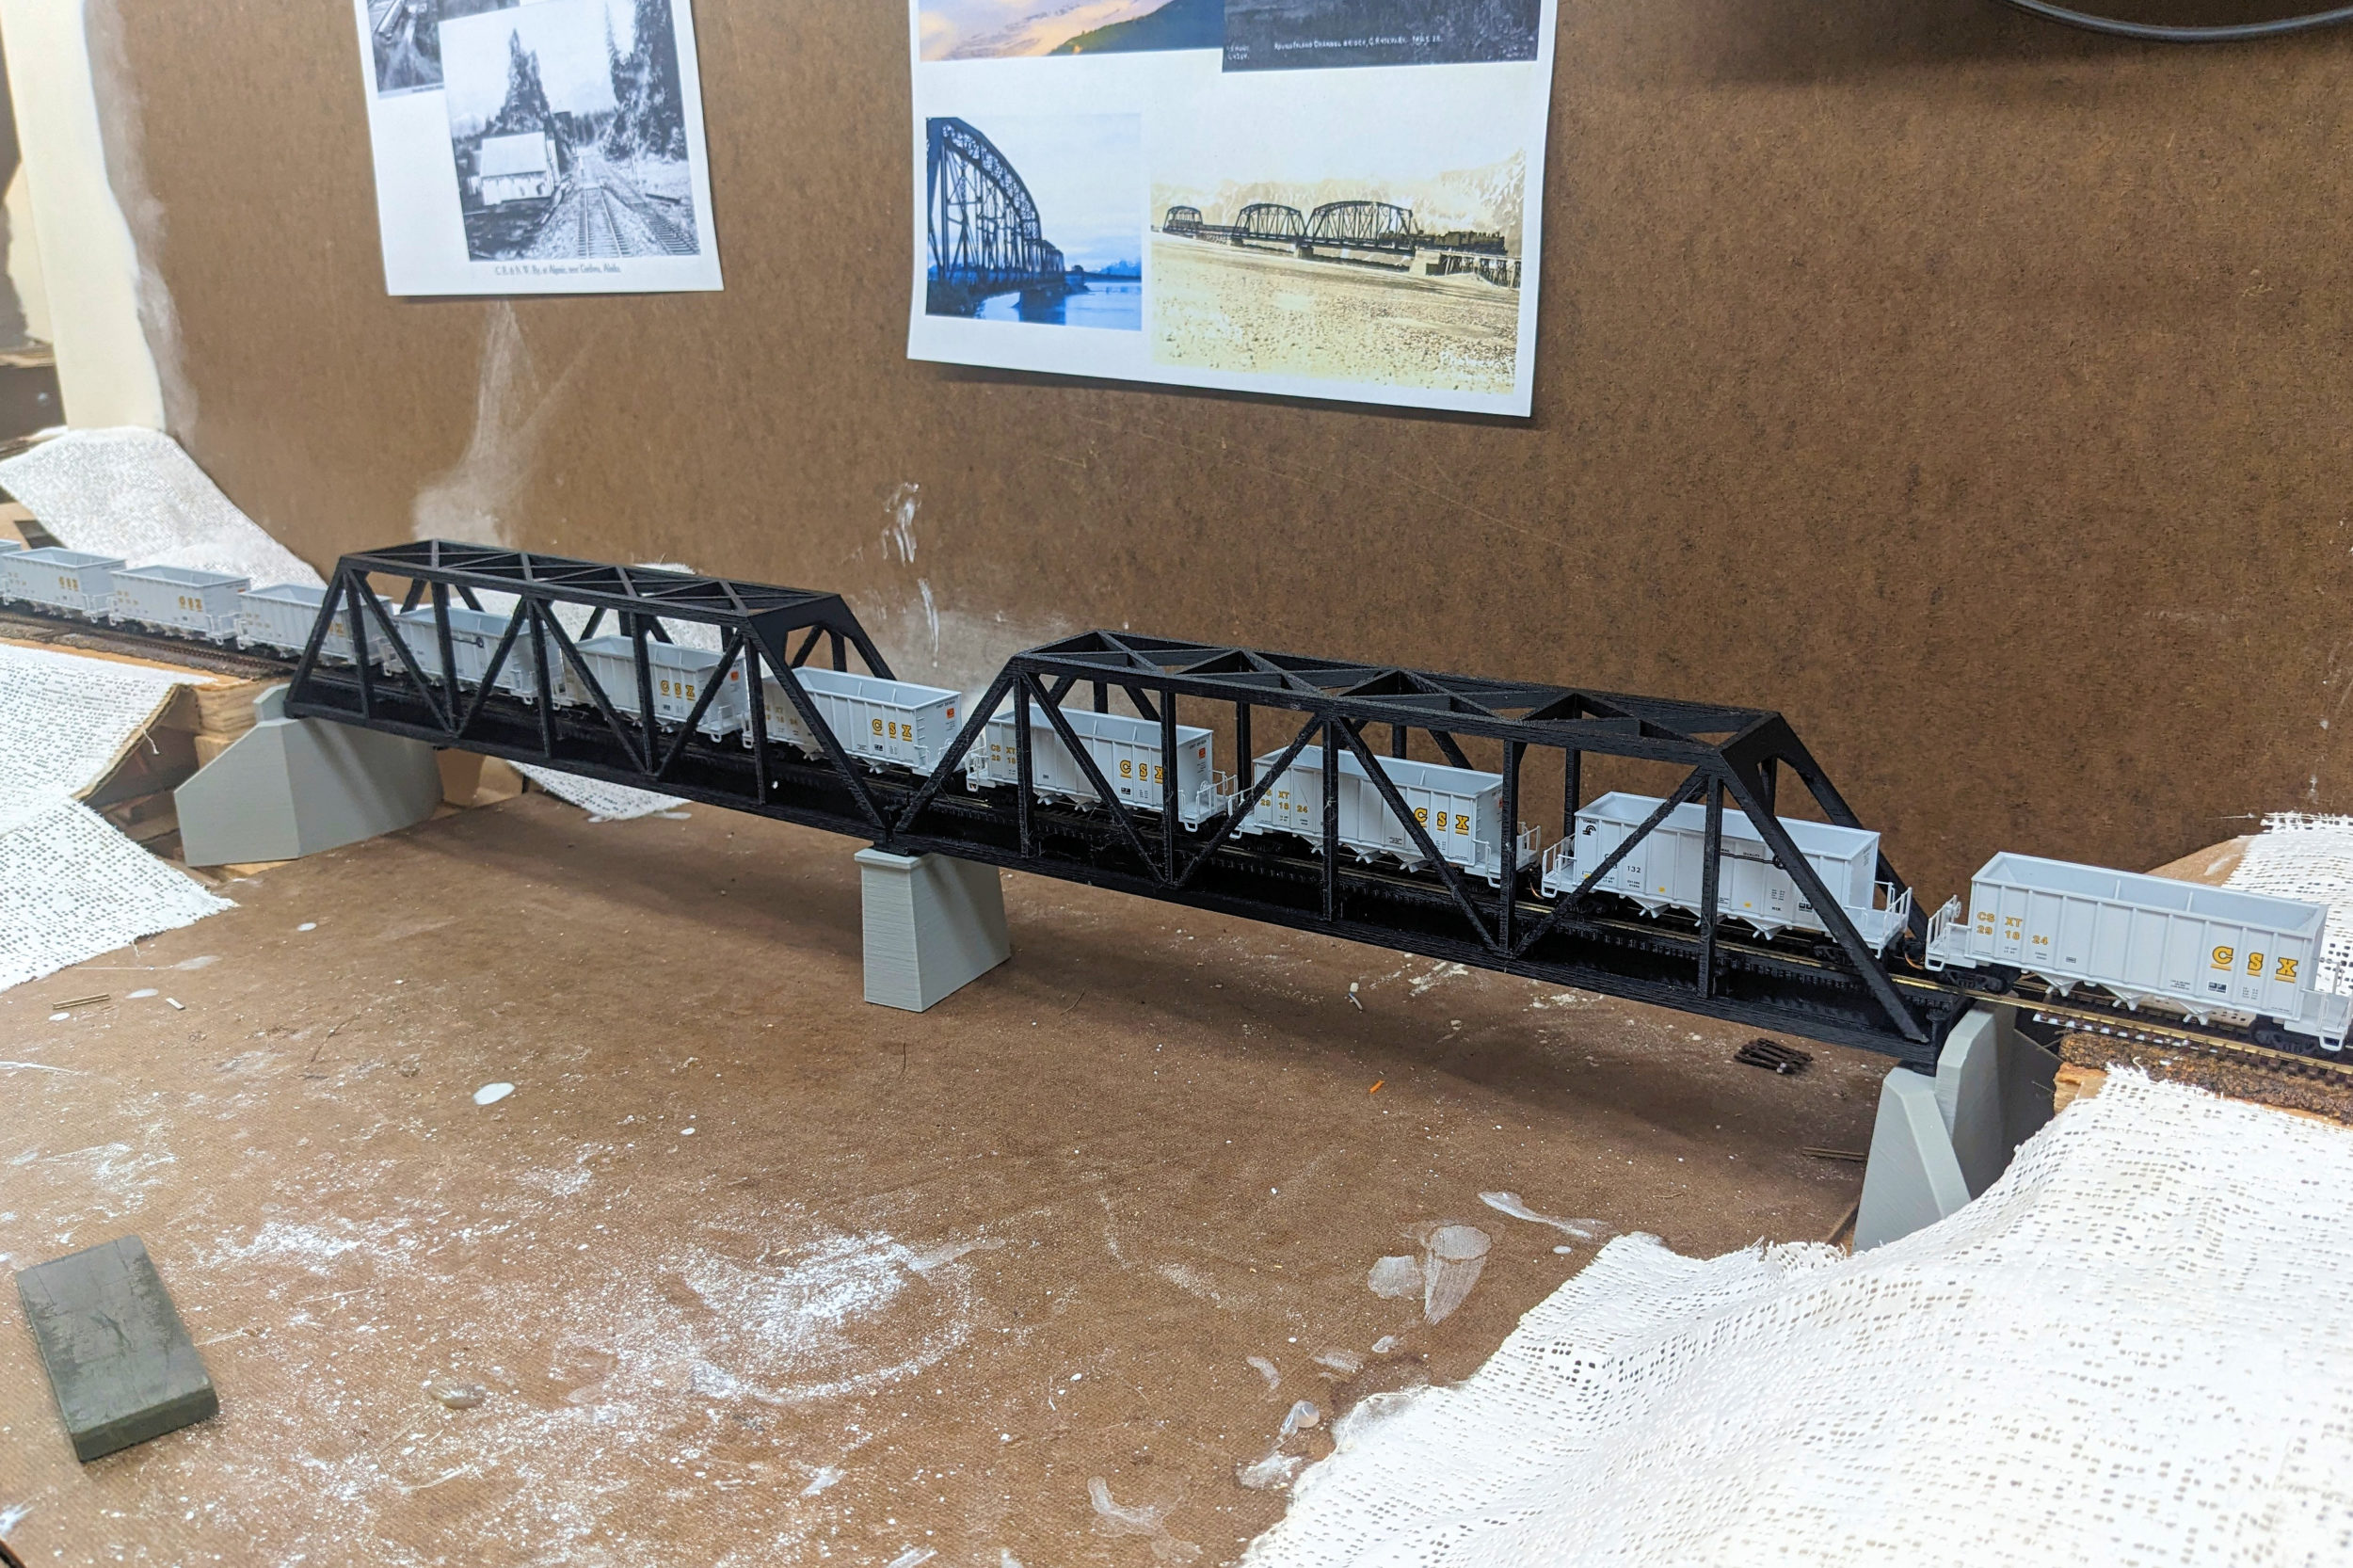
I finally settled on two truss spans on the side of some generic intermediate island and a single span on the other – nominally reminiscent of Flag Point / Round Island but much smaller. These would just be good old 150 ft. Central Valley Pratt truss spans. As with the other spans, though, I’ve opted to just build 3D-printed stand-ins while I work on the surrounding layout scenery to keep the mainline whole.
3D Models
I actually printed these in three pieces – the lower members, the trusswork, and the bridge ties. Each fits just perfectly diagonally on a Prusa MK3S bed. Also, by making the upper trusswork removable, it made it a lot easier to install the bridges and get the rails cleaned. I then just set the trusswork on for now, though I’ll probably lightly secure it with a few drops of CA.
They’re printed out of just standard black PLA to give them some rigidity, but in order to get good bed adhesion all the way across for the base and bridge ties, I had to bump the bed temp up to 70C. The upper truss was printed upside down, such that the top members were against the bed. I managed to do all of it without any support material. Some of the truss diagonals show a little roughness, but it’s passable for a temporary structure to give me the right look and feel while I work on scenery.
The STLs and F3D source files are posted on here on Thingiverse. All licensed CC-SA, so have fun with whatever you do with them.
I’m finally getting to the point – with my recent completion of a spray booth and a mainline that’s once again operational – where I want to start thinking about how I should paint CR&NW equipment for the layout. What should a modern-day Copper River & Northwestern look like?
Let’s consider what the prototype and other Kennecott roads did, and see what that might mean for the layout.
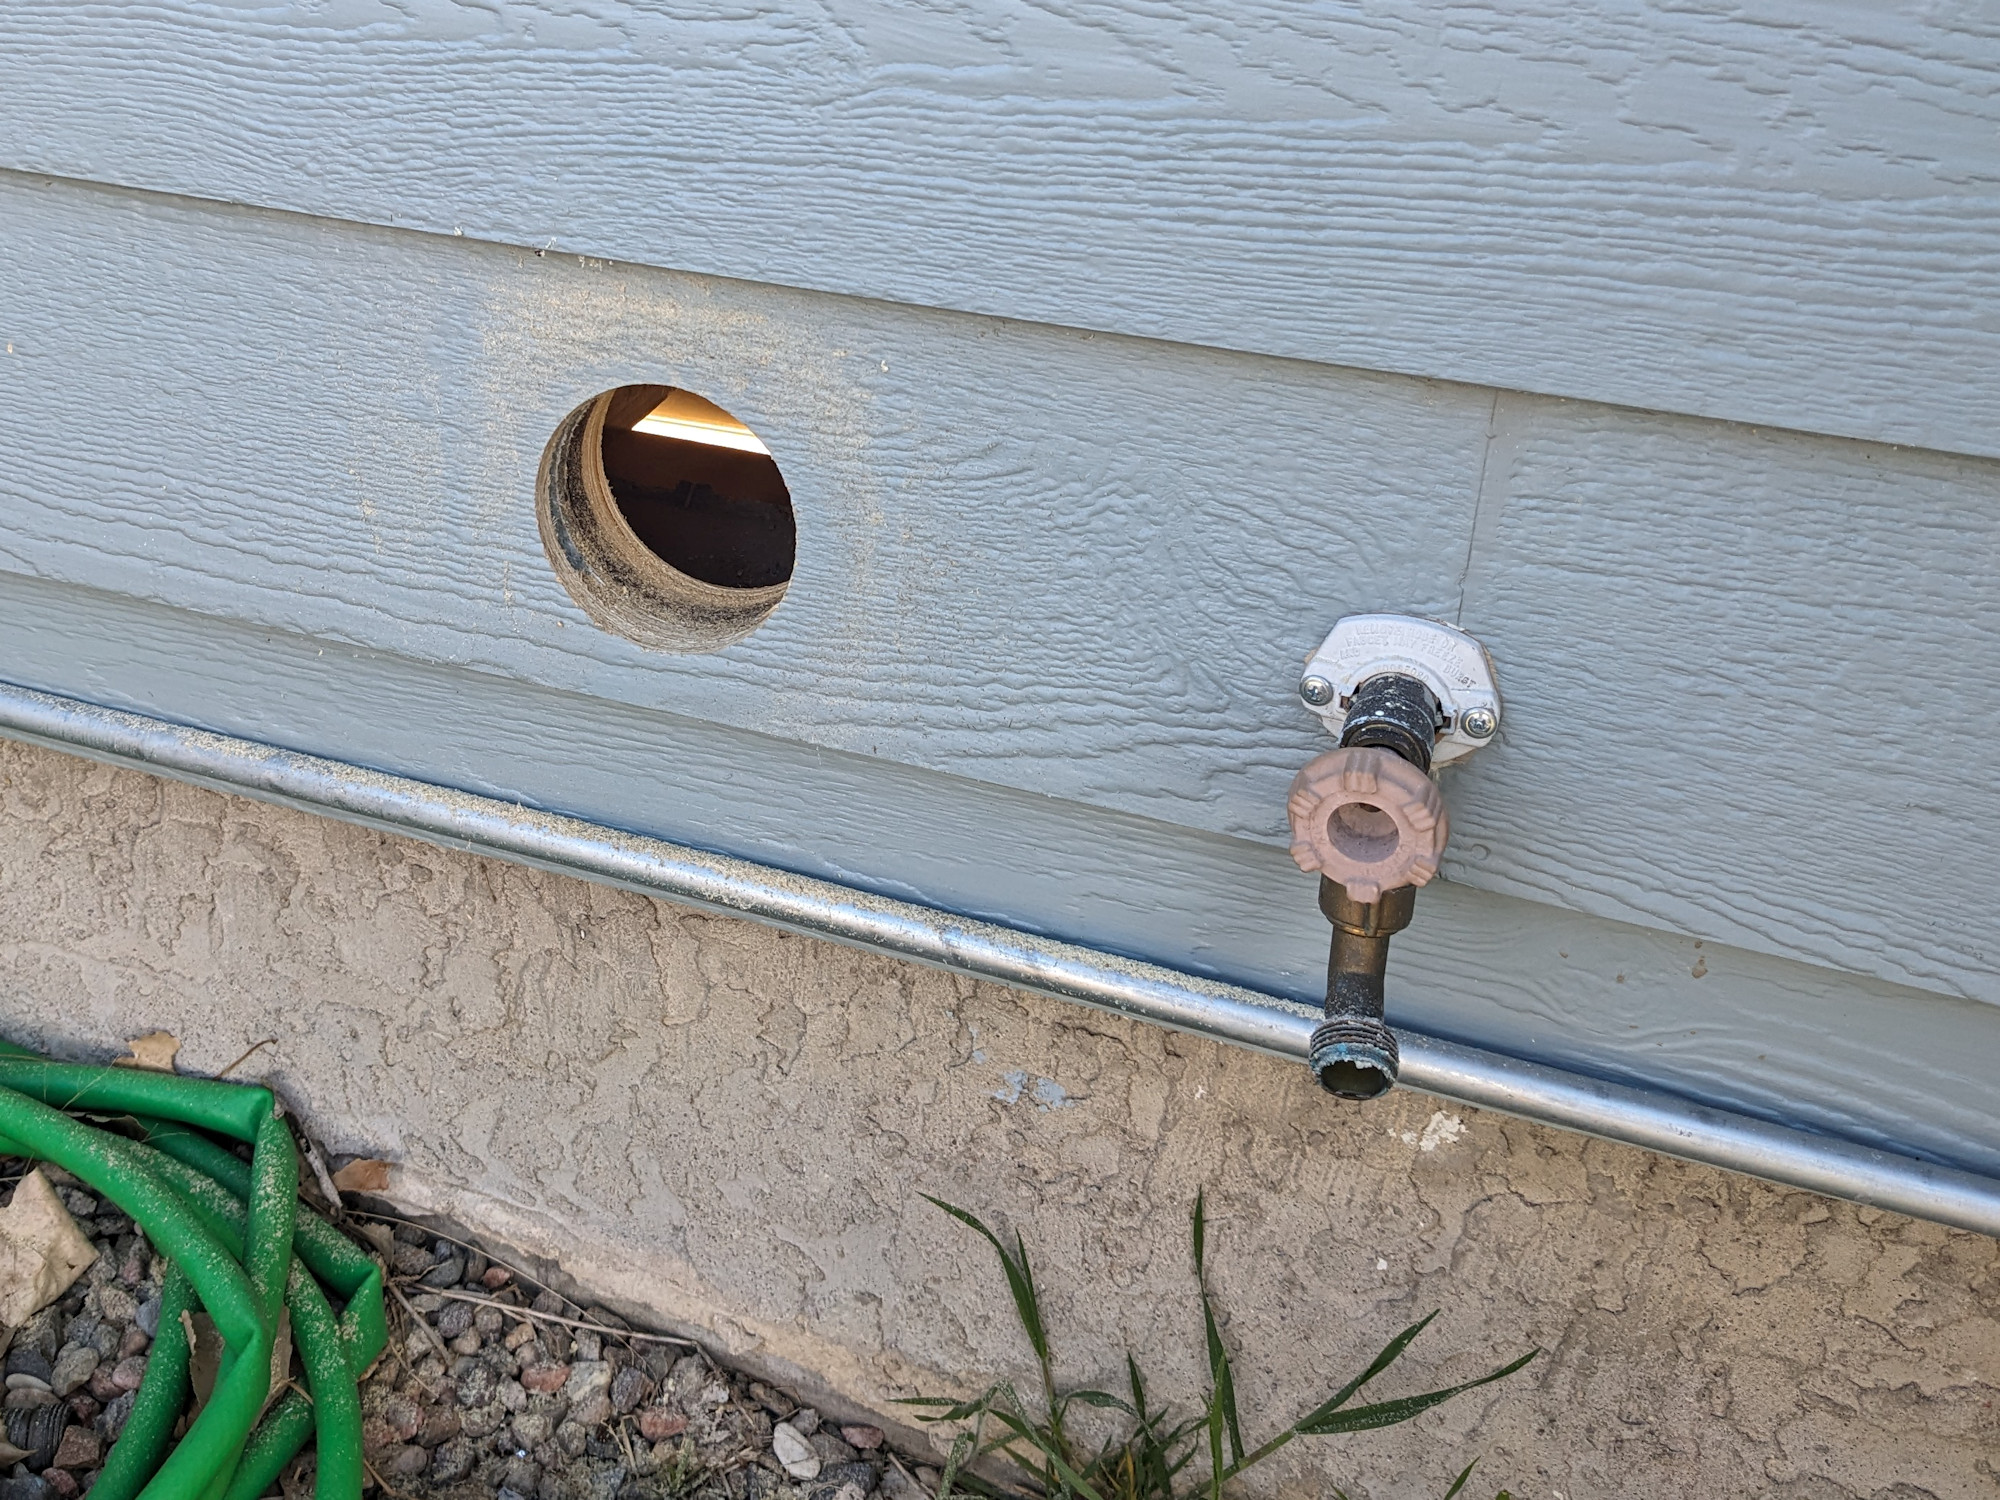
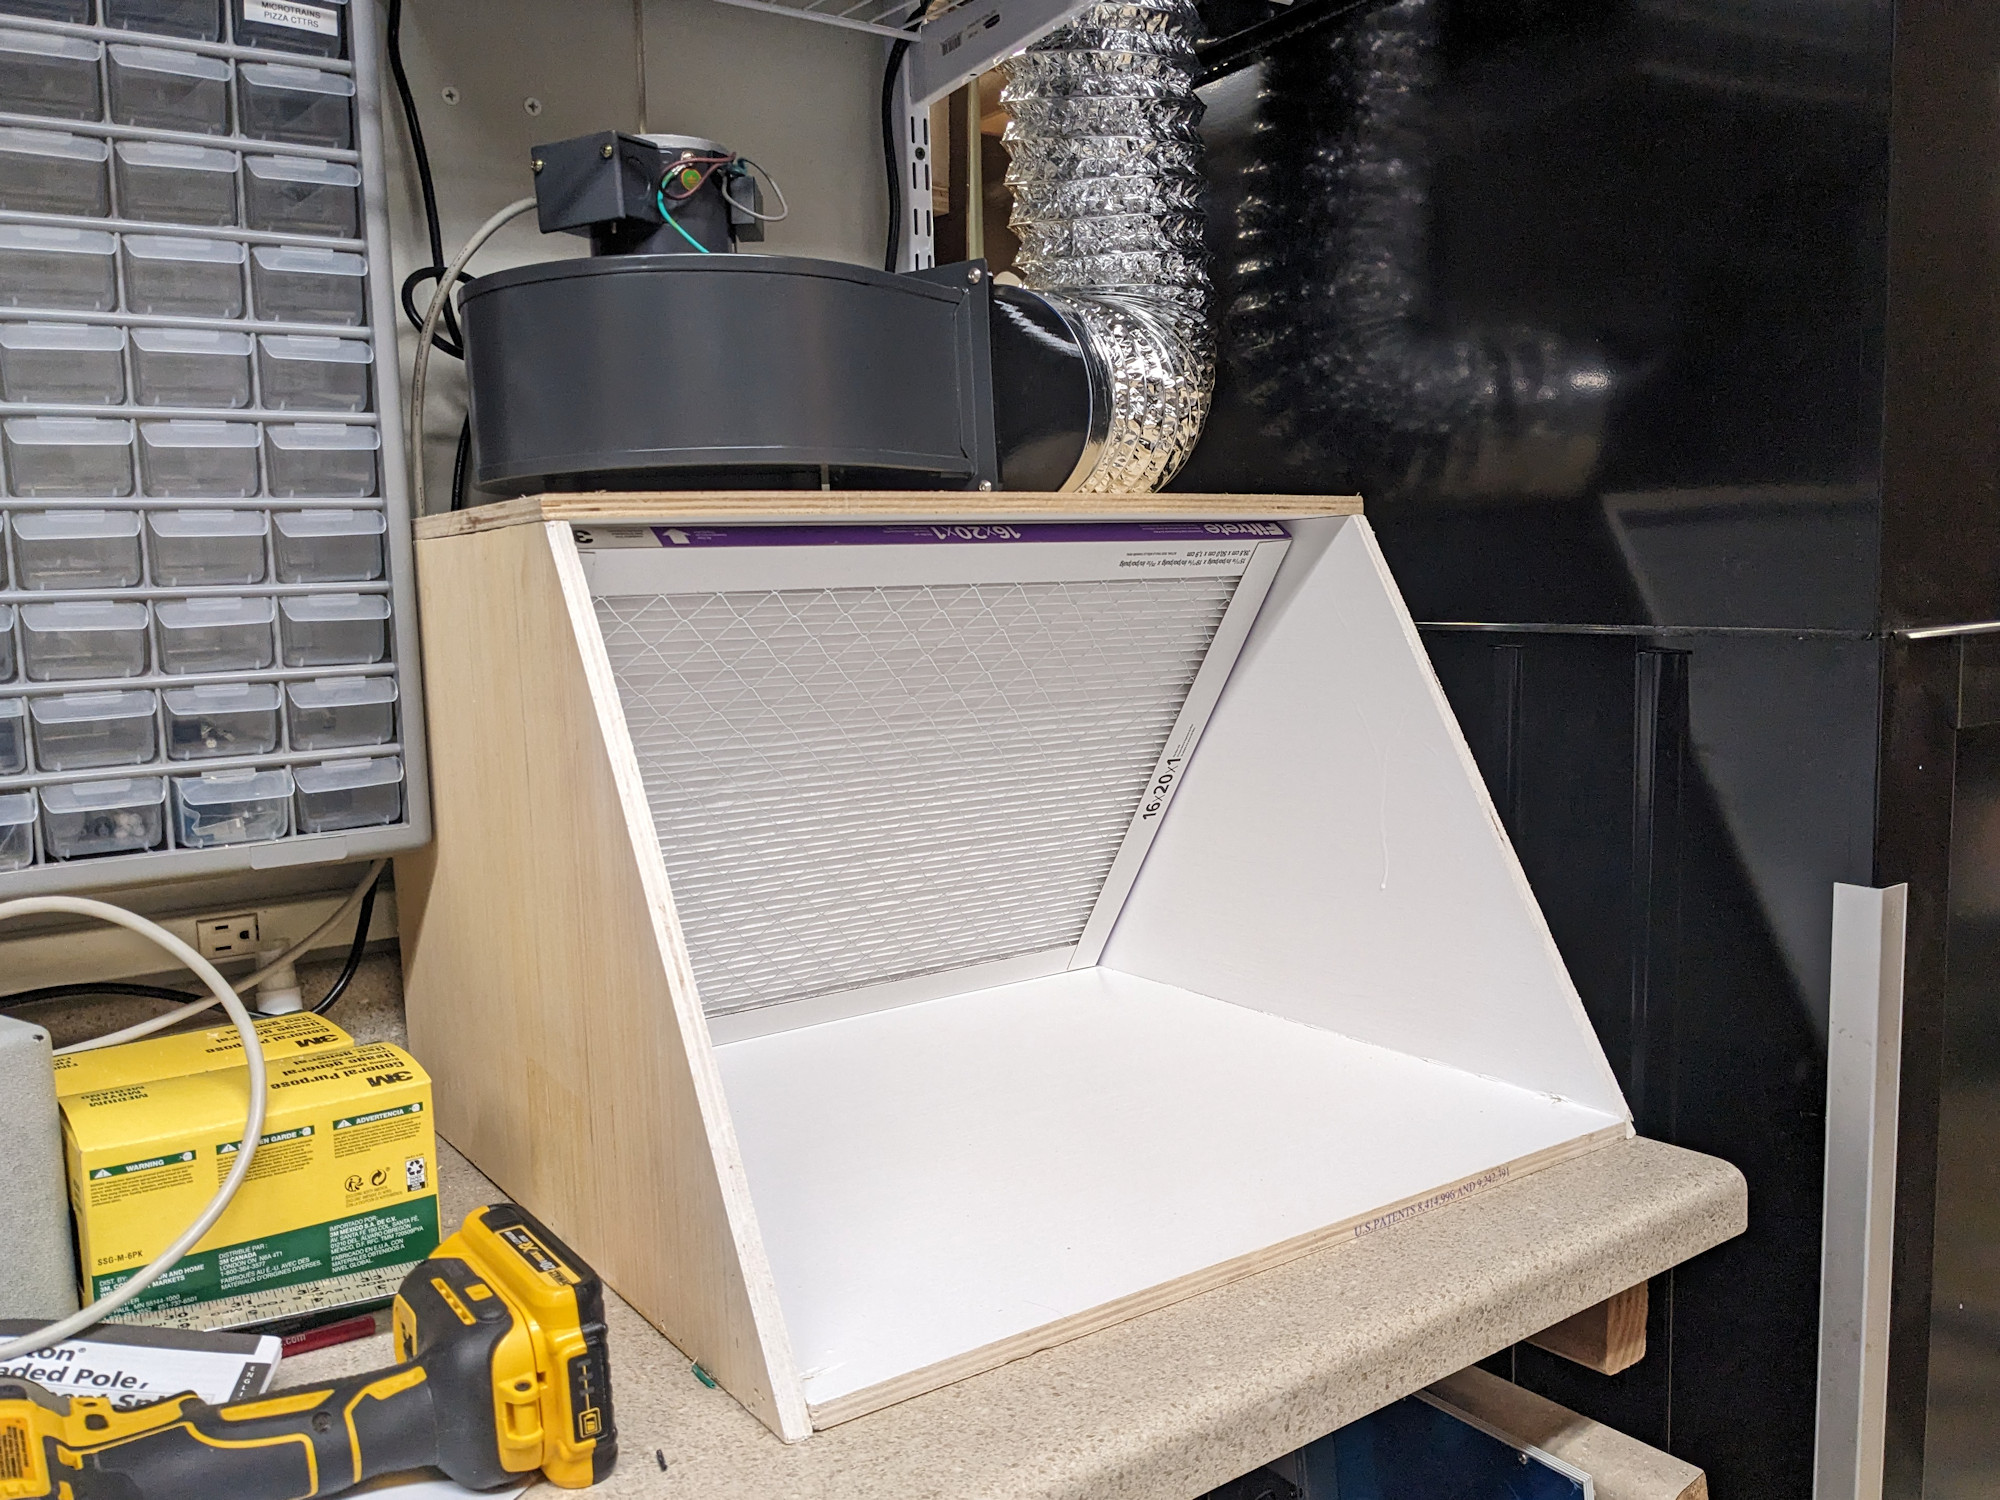
One of the things I’ve been meaning to build since I started this layout was a new airbrush spray booth for the workbench. However, because it involved running a bunch of ductwork and punching a hole in the siding, it was always one of those things I kept putting off. The space on the modeling bench was set aside for it, but I never got around to actually building it.
It’s all fun and games until you start punching 4 inch holes in the side of your house. Then it gets real in a hurry.
Last week I decided the time was finally here. I’m starting to reach the end of “heavy construction” and will be needing to do fine painting sooner rather than later. Michael had recently built himself a spray booth, so I borrowed heavily from that in building mine.
The booth itself is constructed from 1/2 sanded plywood, cut and glued/nailed together. On the outside, it’s 14.5 inches high and 21 inches wide. The top extends out 12 inches from the back to hold a Dayton 1TDR3A squirrel cage blower. We both chose that blower because it moves a significant volume of air, provided relatively low static pressure, and it’s decently quiet. I’ve got 3D printed brackets that hold it to both the top plywood and connect its output to a standard 6 inch flexible duct. (With credit due, Michael designed the top mounting flange, and I did the output duct adapter.) I’ve posted both on Thingiverse if anybody wants to build their own.
In order to minimize static pressure, I ran 6 inch sheet metal ducting about 16 feet over to a spot where I could punch a hole through the outside wall. It’s remarkable how much better for static pressure 6 inch is over standard 4 inch, and since it was hidden above the layout’s upper valance anyway, it was no big deal. Right before it goes through the wall, it goes into a reducer to 4 inch duct, and then goes through the wall using a standard dryer vent.
Inside the spray booth, I just coated everything with a couple rounds of Krylon rattle can gloss white lacquer, and I left the outside as natural wood. A 16×20 filter fits perfectly inside, held in place using the lower rear corner and two clips on the top.
My new airbrush spray booth
Now there’s just the matter of learning how to paint all over again. Last time I did it was ~32 years ago with an old external mix Badger. This time around is a brand spankin’ new Iwata NEO TRN 1, as Scott (Thornton) and Michael recommended.
One of the big problems with modeling the CR&NW is the sheer amount (and variety) of bridges the line had. My layout gets some of the most iconic of the large ones – Miles Glacier, Chitina, Kuskulana, Gilahina, and McCarthy. Some are significantly shortened, such as Miles Glacier at only 40% because I don’t have room for a bridge 10 feet long, some are done at maybe 60-70% full size (McCarthy, Chitina, Gilahina and its “modern” replacement), and Kuskulana is done at nearly 100% full scale.
They’re all scratchbuilding or serious kitbashing projects, because for obvious reasons none of them exist as kits (or even anything close). That sounds like a lot of fun, but it also means the results will be one-off hand built models that will take weeks, if not months, to complete if done to the accuracy I want. In the meantime, I’m going to be working around them doing scenery, painting, etc. that’s likely to accidentally damage a real model.
The upper deck main line has been inoperable for nearly a year now since I removed the temporary plywood bridges at Kuskulana and Gilahina, as they were in the way of starting latticework to support the scenery hard shell. Those gaps in the mainline actually have been a huge mental block. The “not being able to run a train” factor combined with the overwhelming nature of all these bridges to model. About two weeks ago, I decided it was time to build something between plywood and the final models – some temporary bridges. Close enough to the real thing to be plausible, but cheaply and quickly constructed using 3D printing.
I know, it’s been some 18 months since I posted any update. Turns out, if you want to get nothing done on your layout, start a model railroad company. The RasPi Zero W at the core of Iowa Scaled’s wifi receiver for the ProtoThrottle has been basically unobtainium for the past two years, so I started redesigning the receiver last summer. That involved hardware design, learning a whole new microcontroller and toolchain (the ESP32), and rewriting the whole thing from scratch – twice. Fortunately that long endeavor is at an end and finally to market, so hopefully I’ll have a little more time back. On the other hand, I really hate my day job these days and would like to have ISE become my full time income, and that’s going to take a lot more new products that sell a whole lot better in order to replace the paycheck that my professional job provides.
And if that’s not enough, I got suckered into being an assistant editor for Drip Points, which is one of the two main magazines of insulator collectors. Yes, I have hobbies beyond railroads, and putting out a professional, full-color magazine every other month takes a bit of time.
Basically, been a bit burned out for the last year. My hope is to get back to scenery this fall. I figure if I can get some hard shell on, then I can start weathering track, painting backdrops and fascia, and then start building the hundred trillion trees I’m going to need.
Those who know me know that I have a mortal fear of starting scenery on a layout. Benchwork, trackwork, and electrical don’t bother me at all – in fact, I’m quite fond of all three. But at some point, those three have to be called “finished” and I have to step off into that great bold beyond known as scenery. I’ll be honest, the last time I got this far was 25 years ago on the layout I had in high school. No layout in the middle has lasted long enough to sprout even the tiniest speck of ground foam, or a tree, or even hardshell.
The CR&NW has finally hit that point. There’s simply no more putting off my greatest fear. So, about a month ago, I started gluing cardboard strips into landforms.
I started on the section between Strelna and Chitina – including the third Copper River bridge – simply because it was one of the most accident-prone (narrow trackwork with a long plunge to the floor) and because it offers some significant hills and cliffs to start with. It’s also one of those spots that bends the prototype a bit more than others, since I had to compress a long, largely linear grade down Kotsina Hill into a short wrap around the end of a peninsula.
I also did a bit of work on the lower deck between Round Island and Katalla Junction, since I was already cutting hardboard for river bottoms and it was nearly below my work area on Kotsina Hill.
Here’s where we are so far with a test train for scale.
Starting to drop down Kotsina Hill, notably shortened from the protototype
And around the other side, stepping out on to what will be the third Copper River bridge just outside Chitina
The start of terrain at Katalla Jct, with the start of Round Island in the background
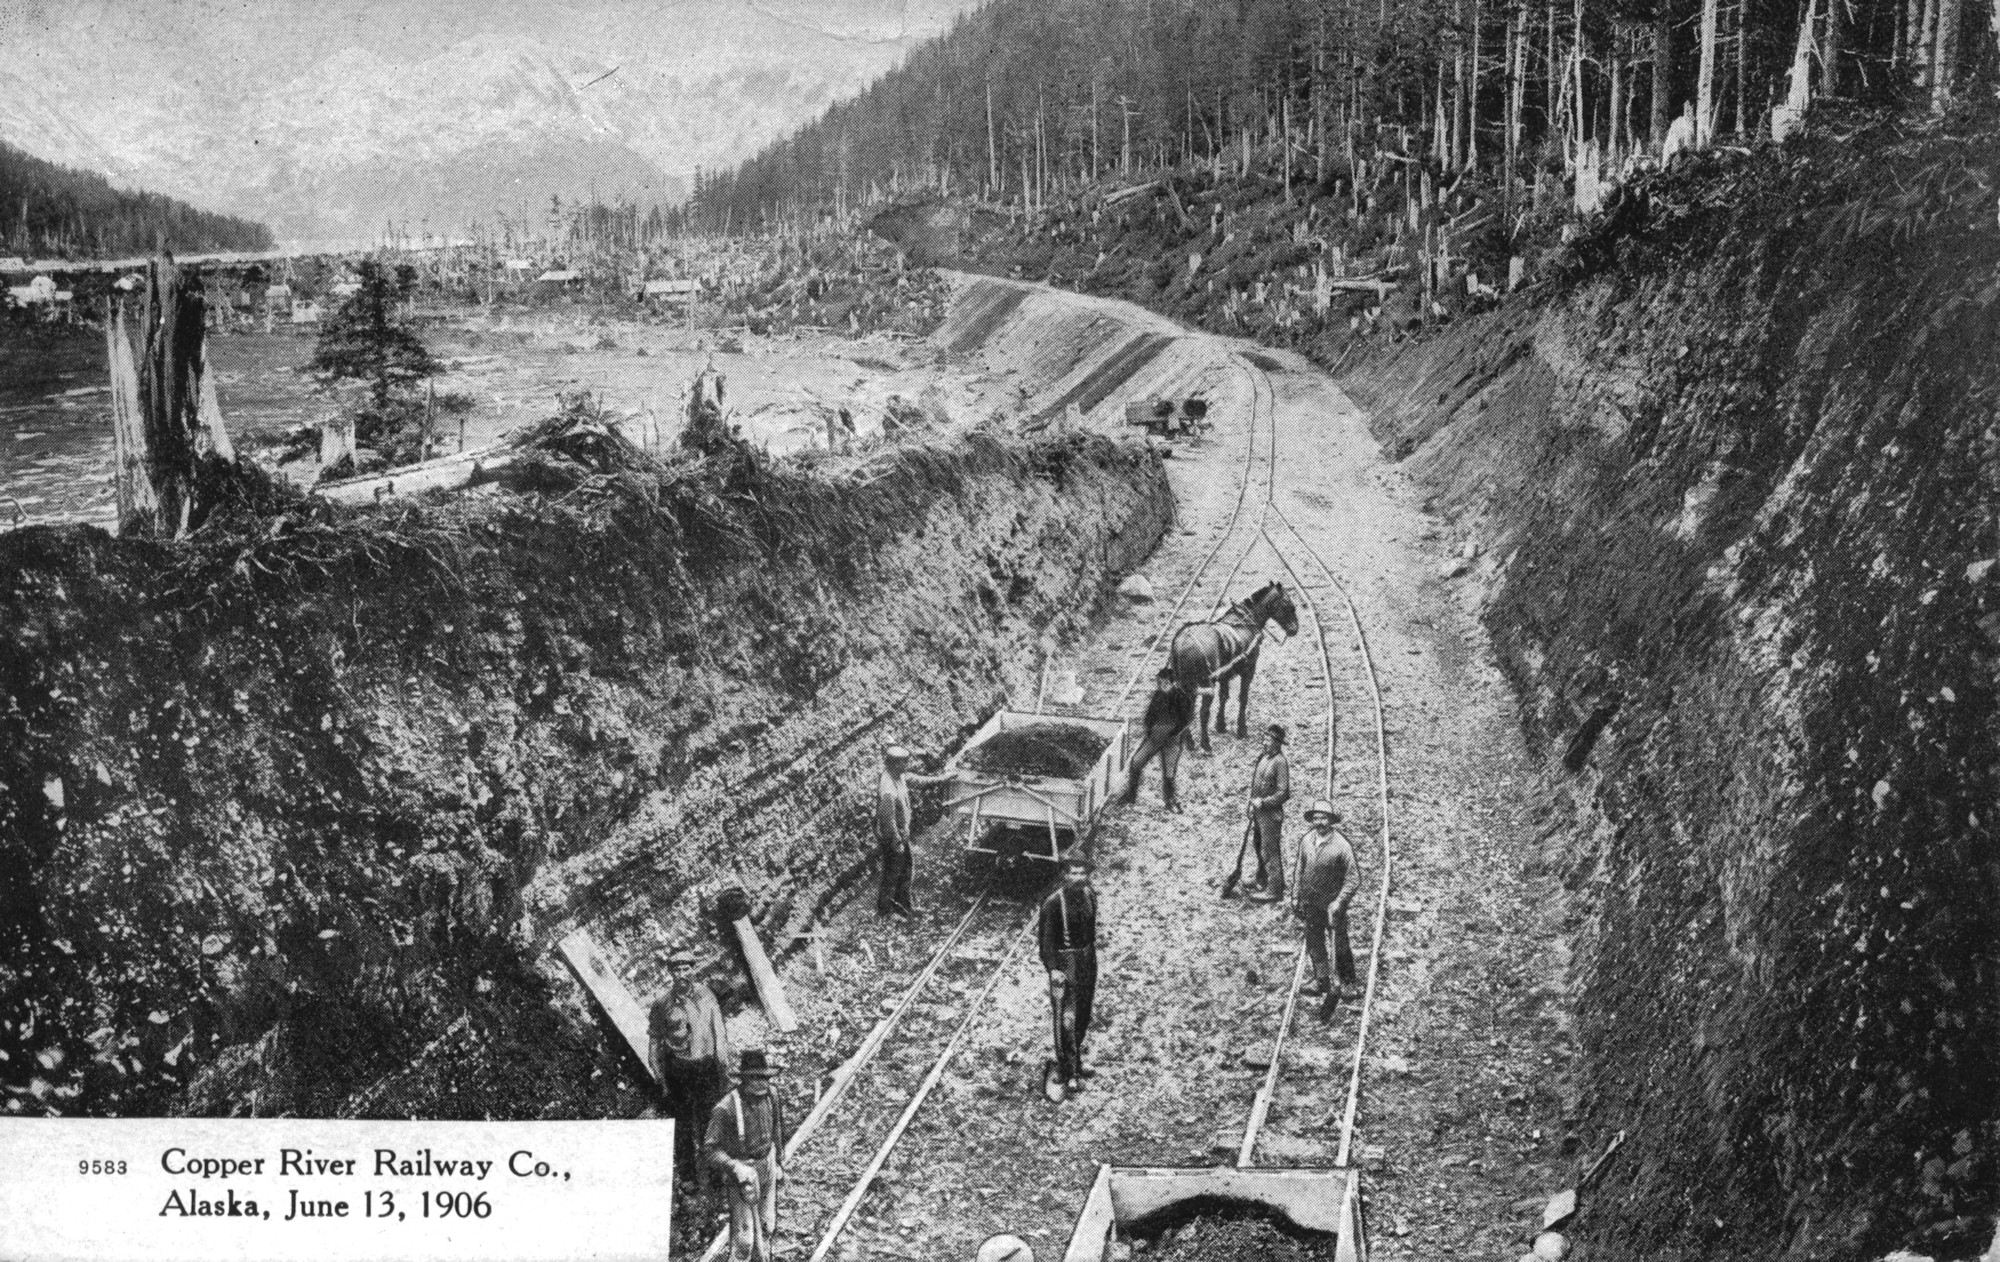
Copper River Railway construction of cuts and fills around the Odiak Slough basin
Another old postcard recently added to my collection shows the Copper River Railroad (incorrectly labeled Railway on the card) grade on the south side of the Odiak Slough. The Copper River Railroad was the original line built out of Cordova in 1906 by Michael Heney (of WP&YR fame), and sold to the Alaska Syndicate and the Copper River & Northwestern that fall. You have to love those horse-drawn narrow gauge construction cars.
Progress this year has been slow. Between my real job, Iowa Scaled Engineering and projects around the house, I haven’t spent a lot of time in the layout room since March. The biggest thing I wanted to get done before getting back to the layout was to upgrade the furnace and finally, after 20 long years, add air conditioning to the house. Believe it or not, it wasn’t terribly common out here until about maybe the last two decades. There would always be a couple weeks in the summer that were terrible, but otherwise opening the windows and having a few fans was adequate. However, with working at home every day now, the higher heat load from all the computers and such, and the pervasive smoke from forest fires in the West in recent years, I decided the time was at hand.
I’d been procrastinating because adding air conditioning to this house (built in 1977) was also a non-trivial exercise. The house didn’t have a large enough electrical feed to handle it, the breaker panel was full, and my old furnace couldn’t handle it anyway. So it was an exercise is what programmers refer to as “yak shaving” – the seemingly endless series of small tasks that have to be completed before a project can move forward. “But to do X, I need to also upgrade Y, and to upgrade Y I need to also fix Z…”
I finally got fed up with it and pulled the trigger in July. Since the furnace is in the layout room and any AC lines would need to work around the layout, I wanted to get it done before any scenery started this fall. And it’s truly amazing what you can accomplish when you just open the checkbook and get some true professionals in to look at the job. In two days, I had a new heat pump, furnace, and the house was updated to 200A power. And now the whole house – including the layout room – stays nice and cool all day long.
New furnace and air conditioner.
And the outside compressor for the system, sited such that the lines run safely around the layout once entering the basement.
Hooray for 200A power! I might actually drop another 20A circuit or two into the layout room, since I’m pushing the limits on power down there.
So what I have I done on the layout lately? Not much. About the only thing I really have to report is identifying a source for new signals. While I love the detail of the Century Foundry searchlight kits, getting enough light through those tiny fibers and just the time it takes to build them isn’t the best use of my time. So I’ve been looking around at other options.
At Spring Creek’s Deshler train show back at the end of July, I found some signals from Custom Signal Systems at Azatrax‘s table. They’re quite nice, though not quite as detailed as the CF kits, and relatively affordable. They’re also nice and bright, which will be important for an operations-focused N scale layout.
A Custom Signal Systems double head type D at South Strelna, along with one of the BCOL Dash 8s for an equal comparison to the CF searchlights from my previous post.
Today’s old photo is of the snowsheds over the line, as shot from what appears to be the fireman’s cab window. The lower part of the line receives unbelievable amounts of snow, and where it ran along the steep banks of the Copper River, avalanches were a frequent occurrence. This is the only photo I’ve ever seen of what I believe to be four snowsheds along the Abercrombie Rapids section of the Copper River, just to the north of Miles Glacier bridge.
But there’s the nagging question of which locomotive is it?
That box with the tube sticking up visible at the bottom part of the frame is unmistakably a slide valve on top of a piston, which means this is an early locomotive. Of the CRNW fleet, slide valves limits it to the 0-4-0Ts, 20-22 (23 appears to have piston valves, or perhaps acquired them later in life), 50 (and likely 51 if it existed), and 100-102.
The bevel below the slide valve box into the main cylinder removes the 20s, 50, and the 0-4-0Ts from consideration. So it’s probably one of the 100s, but then there’s the two foot ledges you can see in the picture. That doesn’t fit any of them that I’ve seen pictures of, so perhaps we can’t really tell which engine this is. Thoughts?
Looking south from the cab towards four snowsheds in the lower parts of the Copper River canyon, likely between Abercrombie Rapids and the Miles Glacier Bridge