This thing is actually starting to look like a proper layout rather than just a bunch of track on 3/4″ plywood cookie cutter. At 22:30 Friday night, I joined the upper deck fascia. The lower deck took just a bit longer – 14:00 on Saturday afternoon – because I needed to wait on some brackets to print. With that, the layout fascia is complete and I can move on to cleaning up the room, finishing electrical, and starting to shape in the terrain.
Let There Be Light!
As long-time readers (or others who know me) know, I have a bit of a fascination with layout lighting and making it part of the overall operating day experience. Plus, it’s easier to work on a layout – either from a construction, detailing, or operations standpoint – when there’s excellent lighting. So in today’s post, we’re going to look at what I settled on for lighting the Copper River.
Continue readingAttaching Fascia
Since 2020 is officially the year of not leaving the house, I’ve actually made some progress on the CR&NW. More of my time has gone to other projects, like resurrecting a 1940s searchlight signal in my back yard, but the layout is moving forward.
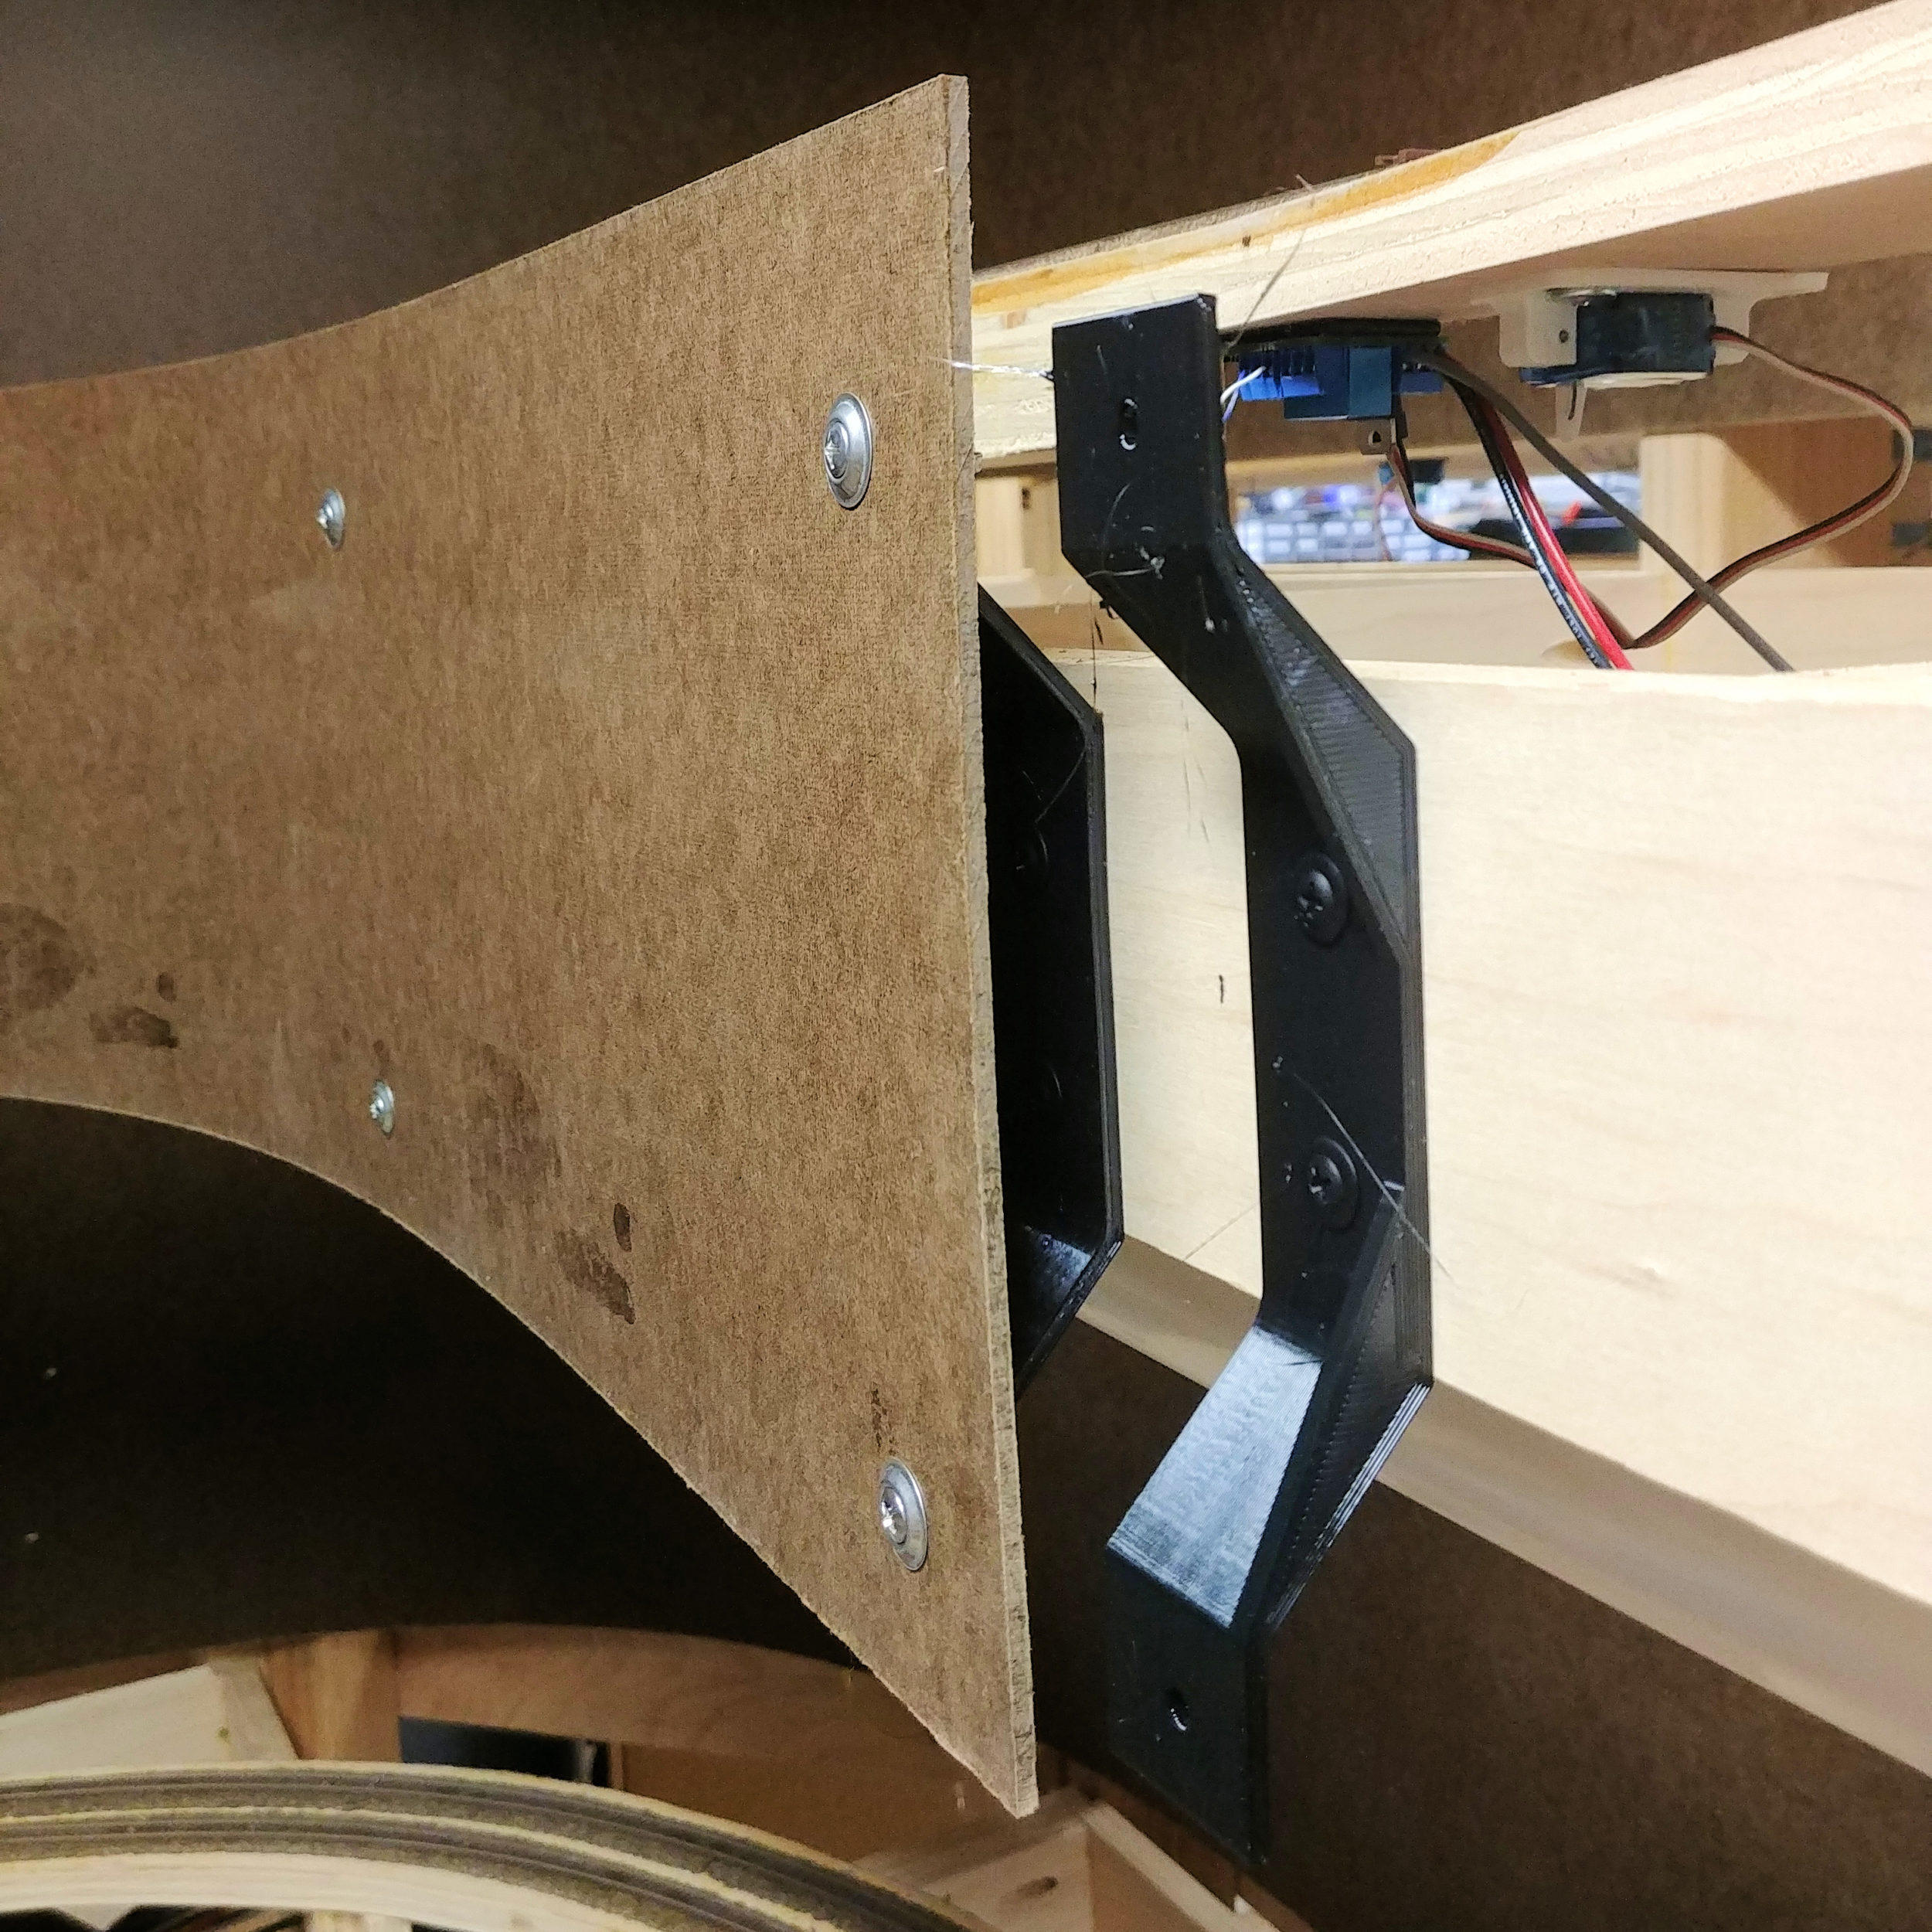
One thing that’s never been quite clear to me is how folks attach fascia board to open grid benchwork in a secure way, such that it’s solid enough to support the weight of an operator who stumbles, yet there’s enough room behind it for the mounting of controls and some modest wiring. If you just screw it straight into the front of the grid, it’s solid but there’s no room for switches and wiring. If you mount it on some standoff wooden blocks, there’s room behind, but has a lot of flex to it. Plus that’s a lot of standoff blocks to cut.
Then I realized I have a 3D printer and this seems like an excellent way to solve the problem – printed standoff brackets.
Continue readingPowering the Layout
In addition to track power, which is something most of us have provided by our DC throttles or DCC systems, most of us have a ton of accessories. That can be as basic as things like switch machines or a hodge-podge of building lights, animated features, signals, sound modules, etc. Nearly every single one of those is going to have its own requirements in terms of voltages, currents, etc. Most layouts I’ve ever been on solve this by a maze of power strips, wall warts, battery packs, and old DC power packs repurposed once the owner converted to DCC. It’s a mess.
As an electrical engineer, some things about how people build layouts bug me far more than they should. Messy, disorganized power systems are definitely at the top of the list. I thought I’d give you a look at how power is distributed around my layout to run everything that’s not the track.
Continue readingMainline Completed – Only 2475 Days Later…
So I sketched out the first track plan for my modern day CR&NW on July 31, 2013. On Sunday evening, May 10, 2020 at about 7:45pm, I finished the very last section of main track, connecting the engine facilities and lower yard at Cordova with the outgoing mainline to Eyak and points northeast.
That sounds like an awful progress rate, and it is, but in there I’ve also started a successful side company, managed many of the technical aspects of a $5B merger between two huge global companies (one of which is my day job), dealt with my father’s passing with all the associated estate work and helping my mother to be on her own, and remodeled my entire house. So my personal life hasn’t exactly been slow either.
Fortunately, unlike many of my co-workers, I’m a natural hermit and this “stay at home” stuff has been tremendous for my personal productivity. Not only have I completed the mainline and all of the Cordova yard/dock facilities, but I’ve installed lighting on about half the lower deck and a third of the upper deck, started installing upper fascia, and am now starting to get all the switch machines installed.
That’s not to say all trackwork is done. I have some work left to go on the yard tracks at Chitina and I need to install the enginehouse track at McCarthy. But that’s all pretty minor. It’s just that it’s waiting on a few more turnouts to show up, given the current scarcity of Atlas #7 rights.
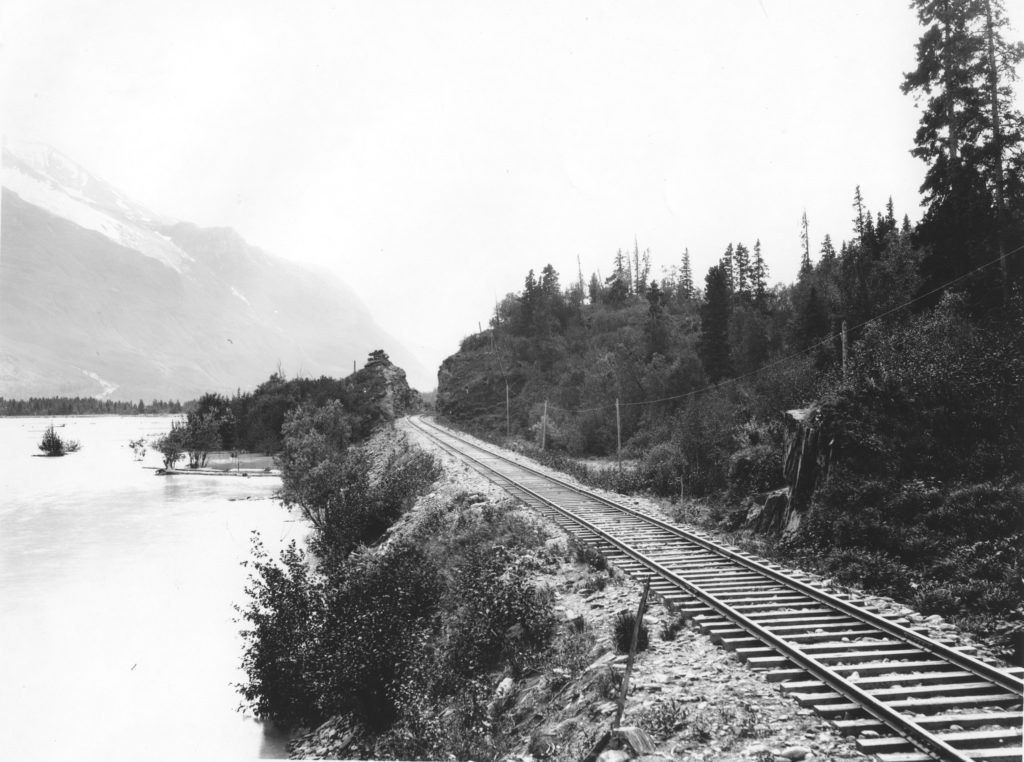
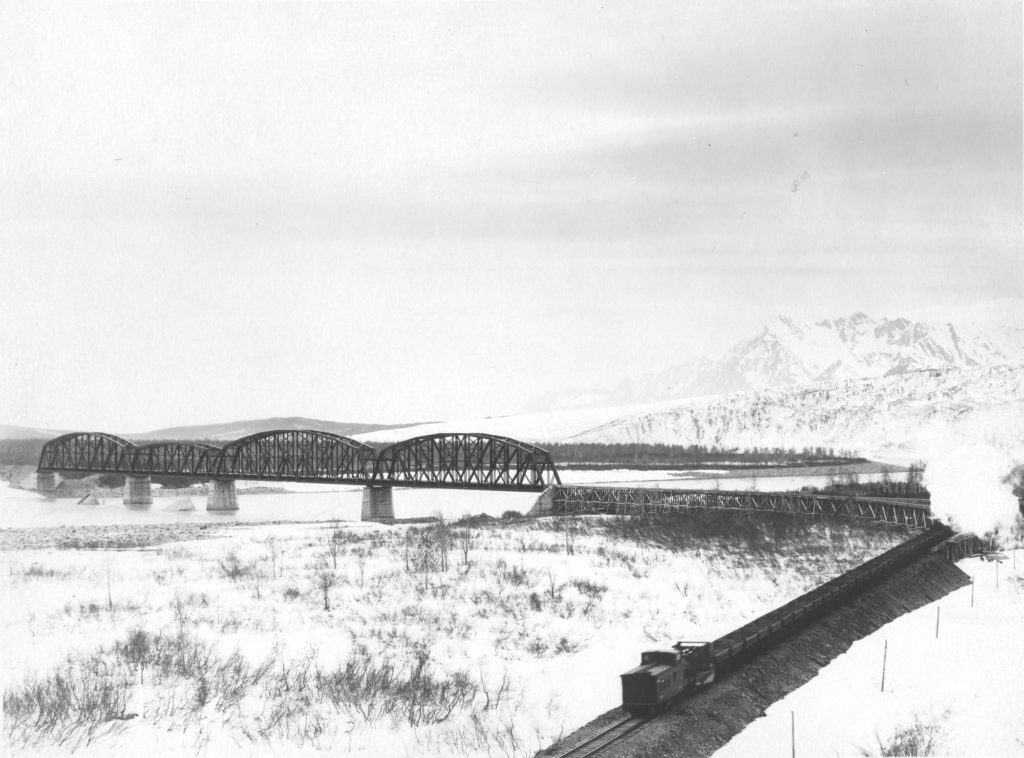
In honor of the main line being completed, here’s a shot from my collection of the real CR&NW’s main line back in the early days of the railroad. My guess on era would be 1916-1920 based on other photos in the same group. As to location? Somwhere between Miles Glacier and (probably) Tiekel.
The Miles Glacier Bridge
One of the photos I’ve recently acquired is this view of a train approaching the Miles Glacier bridge from the east. It would appear to be a work train that’s returning from carrying ballast, given it consists entirely of the railroad’s Western side-dump gravel cars and a spreader on the back just ahead of the caboose.
Another thing to note is the trestle wye at the east end of the bridge. Most people don’t realize there was a wye here, completely up on trestlework. I also find it interesting that I can’t see the Miles Glacier station at the west end of the bridge, but it may be just out of the photographer’s field view.
Progress!
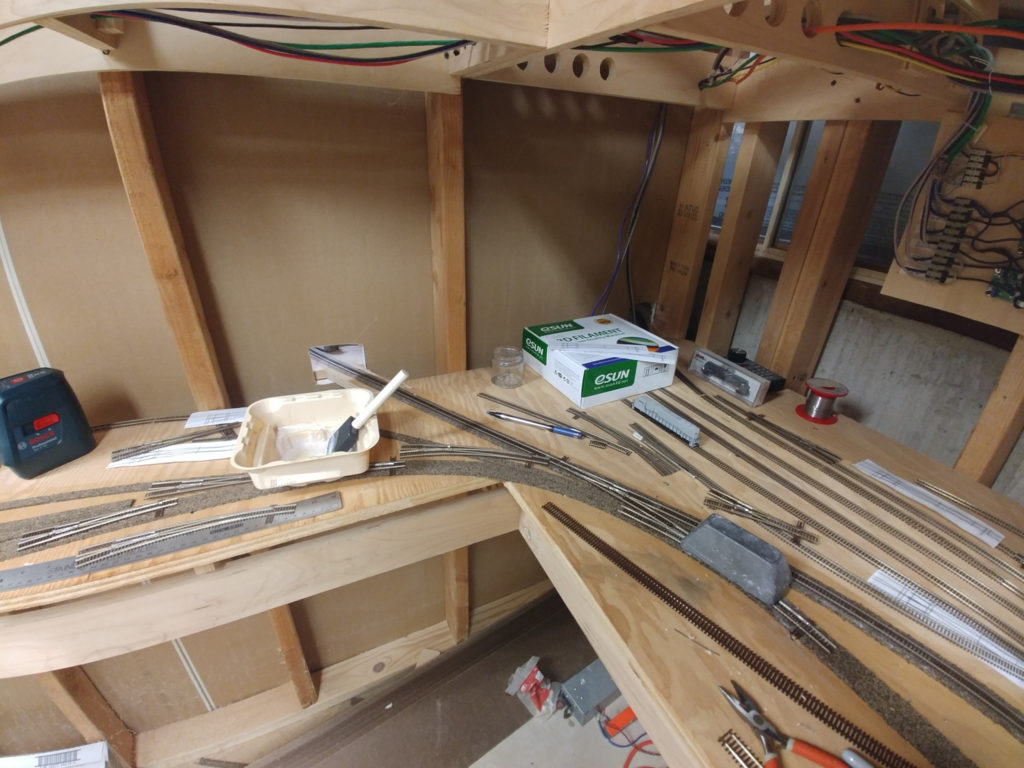
Believe it or not, I’ve actually made progress again. I have a near-final design for the Cordova main yard and have started actually putting down track.
Don’t believe me? Here’s a picture! The barge slip will be to the left, the front half of the engine shop is represented by the eSun plastic box, and the main classification yard will be in the lower right. At the rear will be four storage tracks for ore trains and passenger equipment between runs.
As usual, nothing’s easy. I just ordered every left-hand turnout I need from MB Klein, but there seems to be a bit of a shortage of Atlas #7 right turnouts at the moment. Going to call some of my usual sources tomorrow and see if I can’t scare up about a dozen of them.
Regardless, I should be able to prioritize use of the few RH turnouts I have and at least get the mainline plumbed through. At long last, more than half a decade after I started this project, I’ll finally have a finished mainline. Then I can move along to fascia and scenery.
Kennicott Through the Years
I haven’t posted much in the last year, largely because I haven’t done much. The day job, working on the ProtoThrottle, finishing up my father’s estate and trying to get my mother comfortable with being on her own have consumed much of my life. I have finished up the smelter complex yard and made some other minor progress elsewhere, but I’ll post separately about that.
As a warning, all of the images linked here are quite large, so that you can blow them up and get down to the finest detail.
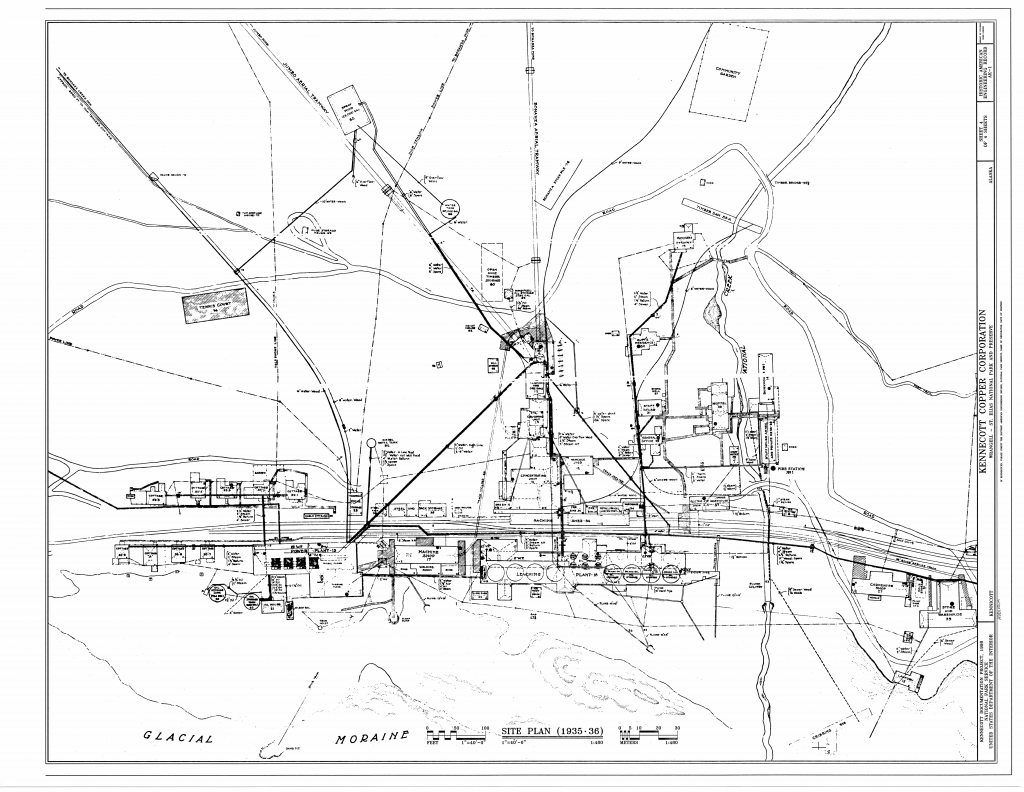
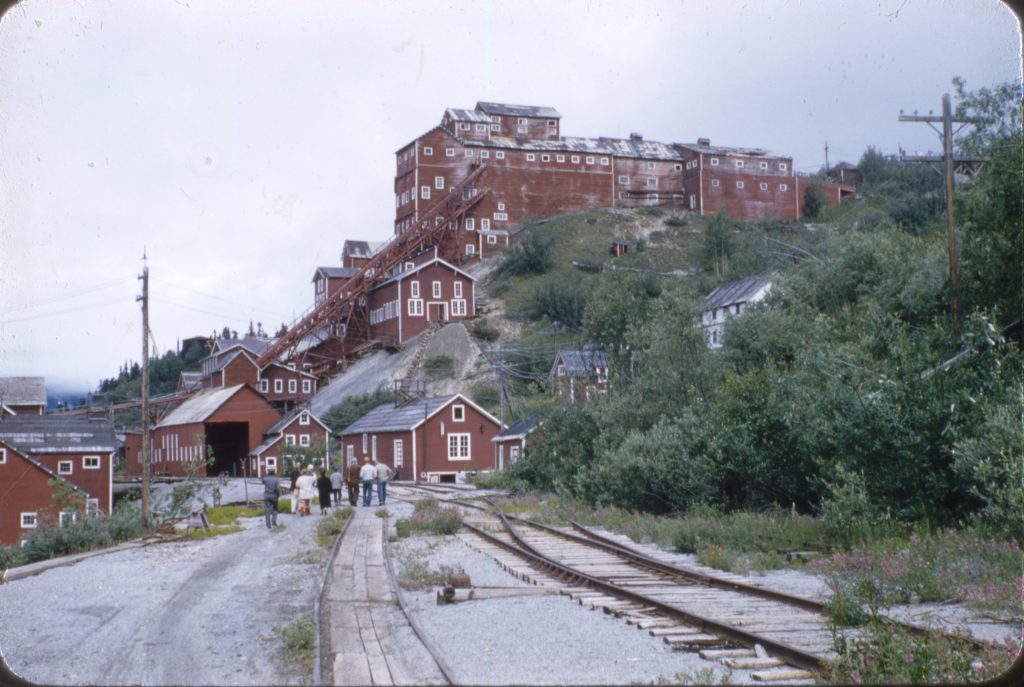
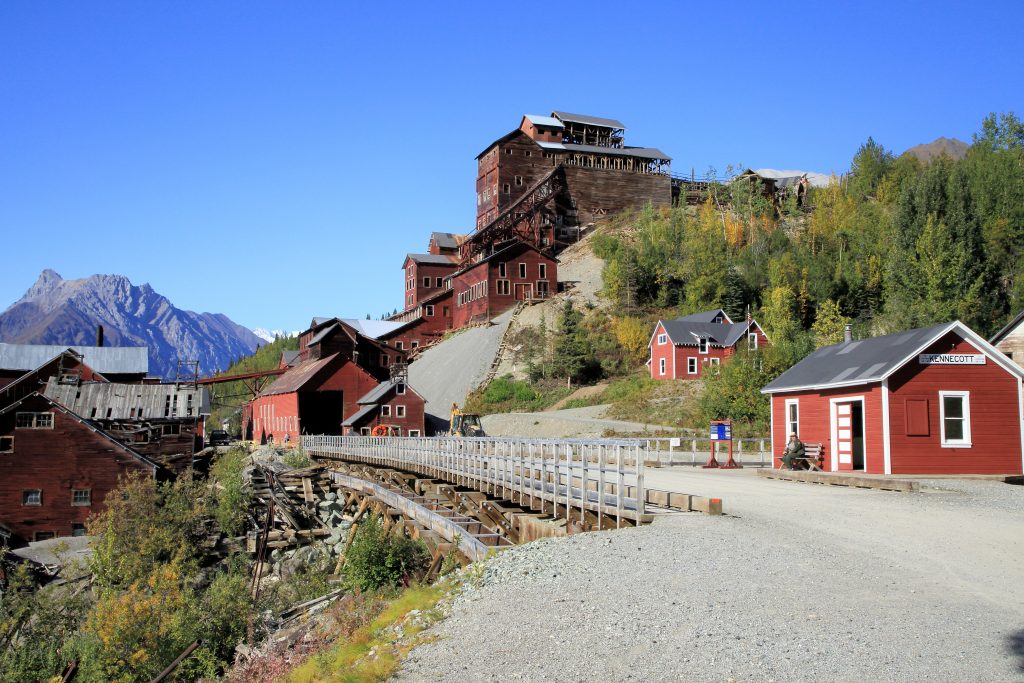
A recent acquisition off eBay was this old slide of the Kennecott Mill, taken by an unknown visitor on July 7, 1957. Overall, the site looks very much like it did when the last train pulled nearly 19 years earlier. The mill building is all there, including the long ore chute trestles from the upper reaches of the mill straight to the sacking house (where the rail cars were loaded). The electrical shop is also still there (the building between the sacking house and the little depot hiding in the trees). The tracks are in (including the 3ft gauge service tram line), the window glass is still there, and the upper floor of the mill, where the ore was received from the tramways, is all intact. I’ve also included the 1935-1936 site plan from the Historic American Engineering Record files on Kennicott, so that you can use the map to identify the various structures visible and get your bearings.
The next available photo I have from roughly the right angle dates from 2004, when my grandfather Harold Bryant visited Kennicott. By this time, the tracks and power lines are gone and National Creek Trestle is looking a bit rough. The roof on the leaching plant (the building in the foreground on the left side) is in rough shape, and the electrical shop is gone. The ore chutes are looking a bit rough, but there’s scaffolding so it appears they’re working on the issue. In addition, the vegetation is a bit out of control on the right where the shop would have been.
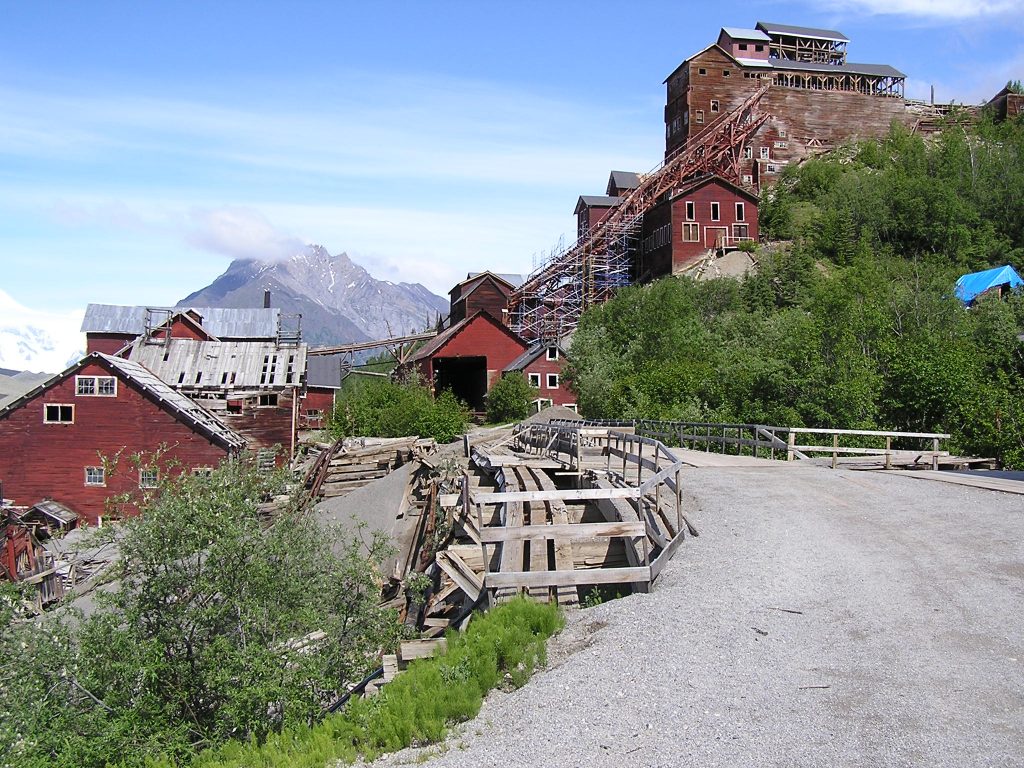
And finally, here’s a look during my visit back in September 2015. The National Creek trestle as seen in my grandfather’s shot was washed away in a flood in 2006, and was subsequently replaced with a modern but reasonably accurate facsimile. Honestly getting at least 70 years of service out of a trestle isn’t bad. On the plus side, the general office building has been restored (seen under the blue tarp over the trees in 2004), and the chute from the mill to the leaching plant seems to be in better shape. The depot also has a fresh coat of paint. The leaching plant itself, however, is in just as bad of shape, and the ore chutes from the upper parts of the mill have been truncated strangely.
I realize the park service has limited resources, and they do a pretty good job for a large government bureaucracy with a relatively small budget, but looking back 60 years makes me realize how much of a different feel the site has today as opposed to sixty years ago.
First Train to Eyak
Not really wanting to do anything I should be doing tonight, I installed switch machines and track power between the south siding switch Alaganik and the south siding switch Eyak.
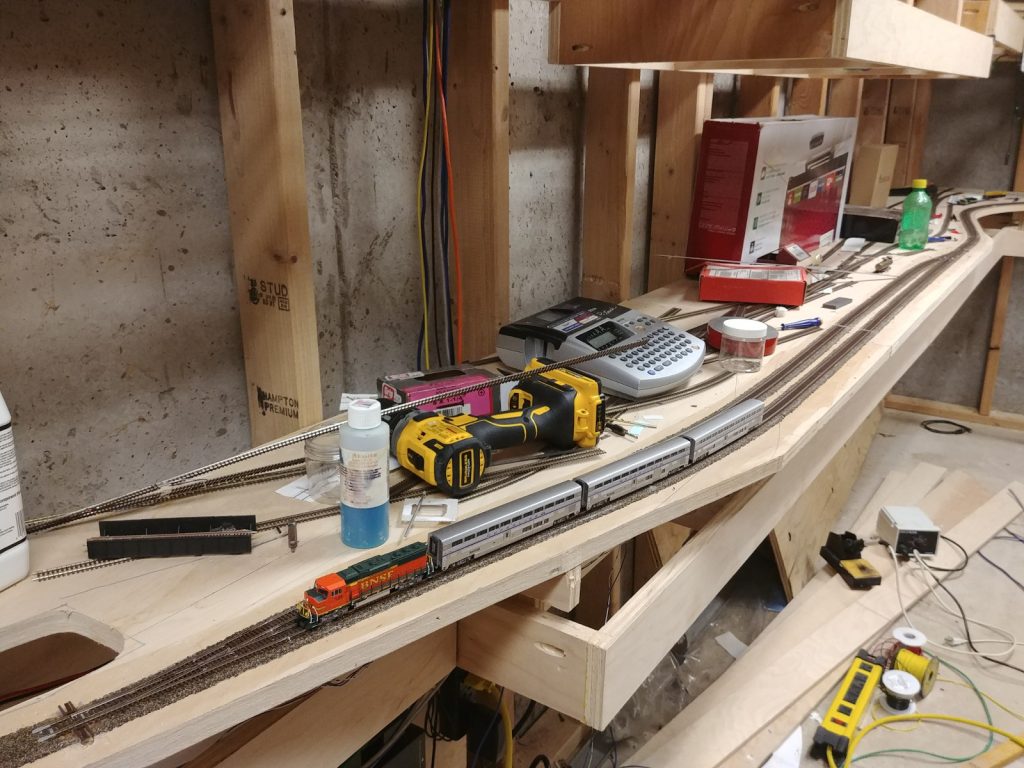
The boxes in the back are mock-ups for some parts of the smelter complex. This is the area that flooded in July 2016, so I haven’t gotten around to putting everything back and working out the yard layout again. I have a few pictures on my phone of the original arrangement, so I can probably figure it out again. Oh well, a project for New Years Day, possibly.
Here’s the first train, sitting just short of the South Eyak control point. Yes, I’m running a BNSF GP60 and some Superliners. Totally not equipment I’ll ever get to run on the CR&NW, but stuff I have because I like the prototypes.
Progress Again, Finally…
At long last, I’ve finally had some time to get back to the layout. Over the last 16 months, work has kept me on the road almost continuously. Also, since I last posted, I’ve had other various calamities taking my time – most notably as far as the railroad’s concerned, baseball and softball-sized hail destroying two of my cars and the entire south side of my house (July 28th, 2016). Unfortunately one of the broken windows was into the basement, allowing torrential rain and some truly epic hail through, damaging some of the benchwork and generally flooding the basement. I was supposed to leave to Memphis the next day, so I pretty much vacuumed up the water, dried off the benchwork, replaced the window glass, set up some fans, and shut the door.
And that was it. That was the last time the layout was even powered up until about a month ago. However, winter’s nearly here, work is settling down a tiny bit (though again, I’m writing this on a flight back from Amsterdam), and I didn’t really want to do anything I *should* have been doing. Plus, the other half of Iowa Scaled Engineering – Michael Petersen – needed somewhere he could test our new Proto-Throttle that had a full-on NCE Power Pro system. So, I dusted off a few things, cleaned the track, and brought my happy tiny universe back to life.
The good news is that mainline rails have now been extended from Alaganik through the airport (Merle K. “Mudhole” Smith Airport – aka CDV – which was built by the Army Air Corps in WWII on the former right of way) up to the south siding switch of Eyak, where the siding comes back in before the Eyak River bridge.
As far as I know, there was no actual siding at Eyak. Quite frankly, it was too close to the north/east end of the Cordova yard to justify a siding on a railroad with so little traffic. However, in my modern day version, it’s a place to stash inbound trains while the yard is busy, or give the Eyak smelter switcher somewhere to get out of the way while mainline traffic passes.
Now the downside… I had the entire smelter complex laid out with boxes sized for the structures and paper track templates. It, unfortunately, was right below the broken window and had an actual torrent of water flowing over the plywood. So all of that planning? On the floor in a jumbled order. I now need to go back and figure out what I’d planned, as it was significantly different than what’s on the initial paper track plan from three years ago.
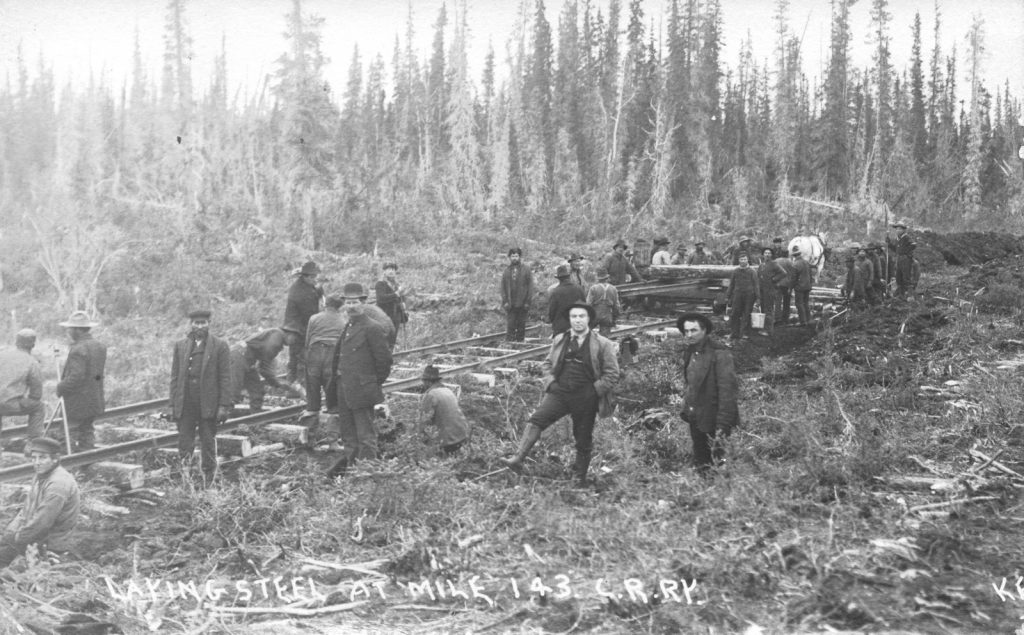
In the spirit of construction, I’ll leave you with this image of the CRNW under construction. This is at milepost 143, or about 3 miles west of Strelna. For a railroad that built such immense and durable features as the Miles Glacier or Kuskulana bridges, it’s really fascinating how lightly graded and constructed the initial construction of the track really was – particularly on the Chitina-Kennecott section. Other construction photos down towards Cordova show a gravel base under the tracks, whereas this seems to be “scrape some dirt and throw down some ties”.
